These days, we don’t really use the default messaging app, as we are more accustomed to using WhatsApp-like apps for instant messaging. However, at times, text messaging is also necessary. But don’t you feel frustrated if the messages app in Android is not working? We all do, isn’t it?
Deleting the cache and force-stopping all the running apps on your device is likely to resolve the message error. Besides, you must also update the default messaging app and the Android OS itself to fix it. Deleting the cache partition and disabling the battery optimization will also work.
However, these are not all the effective solutions we have to fix this error. But, before we dive deep into the solution part, let’s understand what the primary reasons behind this error are to fix it from its root.
Table of Contents
- 1 What Are The Primary Reasons If The Message App Is Not Working On Android?
- 2 7+ Easy Fixes If The Message App In Android Is Not Working
- 3 7+ Advanced Fixes If The Messaging App Is Not Working On Android Devices
- 3.1 8. Clear The Cache Files Of Google Play Services
- 3.2 9. Update Google Play Services
- 3.3 10. Update Your Android OS
- 3.4 11. Set Messages As Your Default Messaging App
- 3.5 12. Stop All The Running Apps On Android
- 3.6 13. Delete Cache Partition In The Recovery Mode
- 3.7 14. Factory Reset Your Android Device
- 4 Conclusion
- 5 FAQs
What Are The Primary Reasons If The Message App Is Not Working On Android?
If the messages app in Android is not working, there can be various reasons behind it. And as the number of android users increases each day, this issue seems pretty common among android users. However, this error typically triggers for seven main reasons, which are as follows.
- There are too many running apps on your device that are interfering with each other.
- There is a cache file congestion on your device that is slowing down all the apps.
- The network configuration is faulty, and the messaging app fails to establish a secure connection.
- You are using an obsolete messaging app that needs an urgent update.
- There is an outdated version of Android OS installed on your smartphone.
- You have installed an outdated version of the “Google Play Services” app on your device.
- You have enabled the battery optimization that is causing interference issues with the messaging app.
Besides these seven main reasons, this message app error can even occur if there is any third-party app interaction on your device. Moreover, you may also get this error if you have any antivirus installed on your device that is restricting the messaging app from establishing a secure connection.
7+ Easy Fixes If The Message App In Android Is Not Working
Before trying any pro methods to resolve if the messages app in Android is not working, you must try all the generic methods we have listed below. And in almost 95% of the cases, these methods are sufficient to resolve this error in no time.
1. Reboot Your Android Device
All android phones use cache files to deliver an enhanced and smooth user experience. However, if there is an error in those cache files, any app installed on your android device can start malfunctioning. And to resolve it, you just need to reboot your device to flush the cache files.
- Step 1: Locate the “Power” button on either the left or right side of your device, and then press and hold it.
- Step 2: Once a new selection menu appears, tap on the “Turn Off” or “Switch Off” option.
- Step 3: Once your phone is fully turned off, keep it in idle mode for at least 2 to 3 minutes.
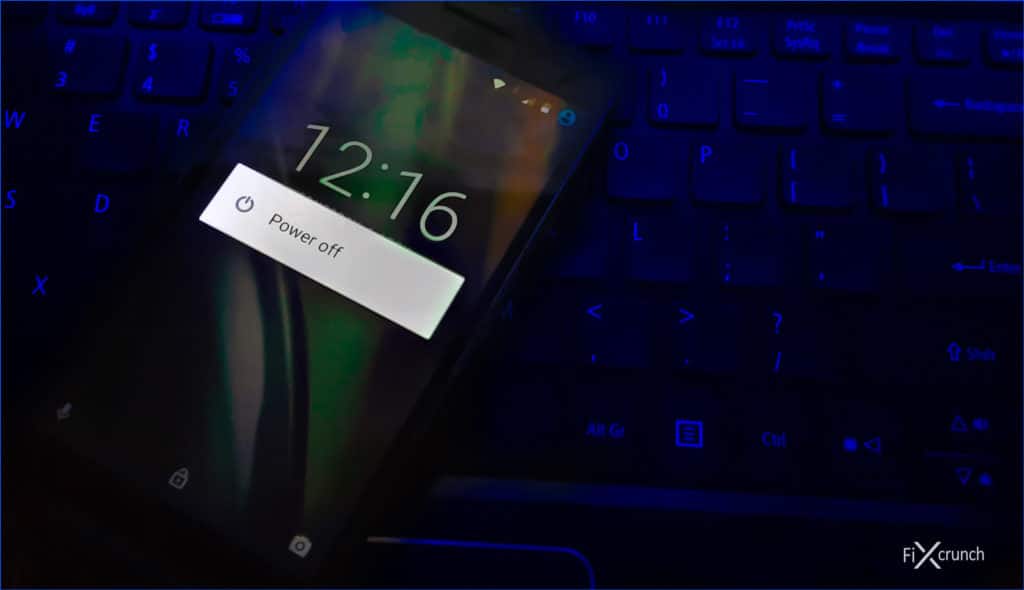
- Step 4: After the cool-off time, press and hold the “Power” button again until you get the welcome screen on your android device.
- Step 5: Let the Android OS load fully and wait until all the applications load.
- Step 6: Now, open your default messaging app installed on your device and check whether you are getting the same issue.
A few of our users have started getting an app installation package error once they have tried installing a new messaging app on their devices. If you are witnessing the same issue on your device as well, follow our step-by-step guide to fix the “There was a problem parsing the package” error in Android devices.
2. Reboot Your Android Device In Safe Mode
At times, rebooting the device may not sort out your problem, especially if there are several background apps running on your Android device. And in such cases, you need to manually turn on the safe mode to eliminate any interference issues if the android messages app is not working on your device.
- Step 1: Press and hold the “Power” button located on either the left or right side of your device, depending on your phone model.
- Step 2: Hold the switch until a new selection menu appears on your device.
- Step 3: Once you get the new menu, press and hold the “Power Off” or “Turn Off” option.
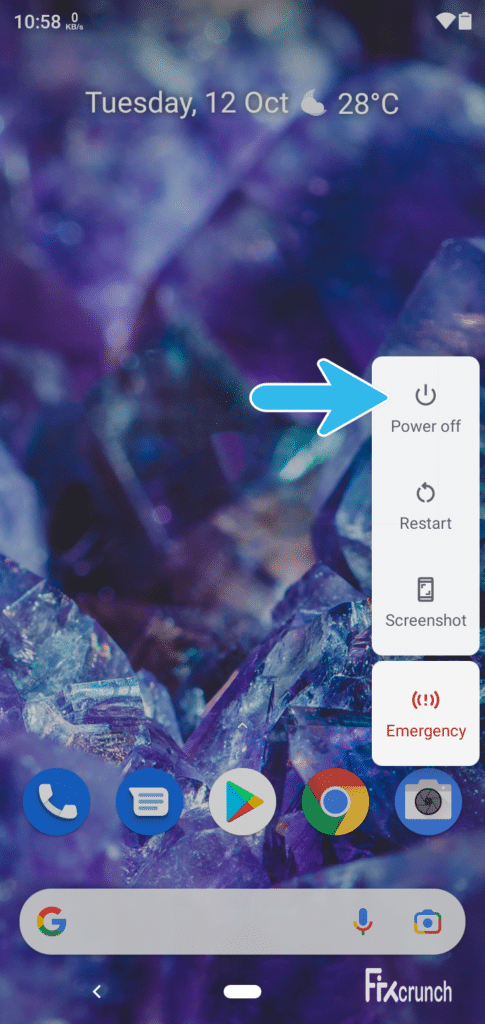
- Step 4: After a new popup box appears on your device, select the “Safe Mode” option from the list.
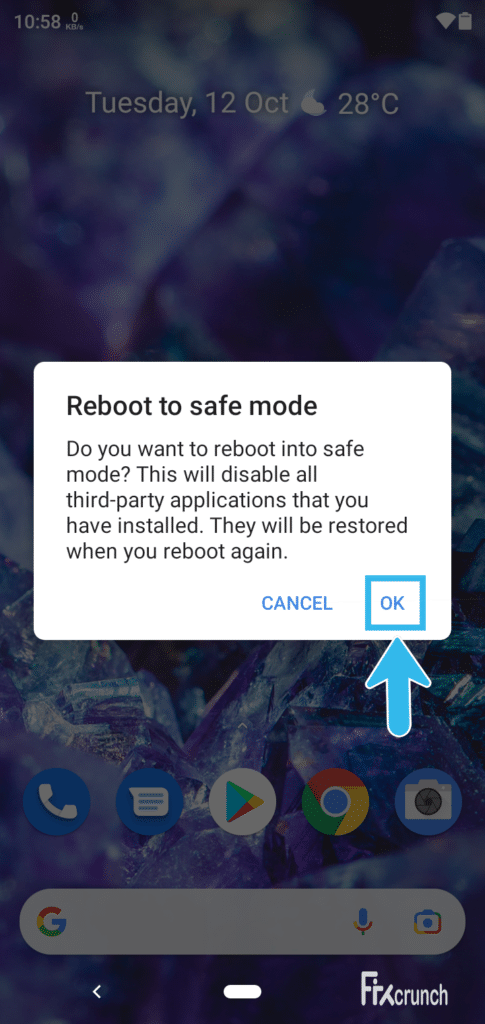
- Step 5: Tap on the “OK” button to initiate the operation.
- Step 6: Let Android OS load in safe mode and wait until all the app icons appear on your device menu.
- Step 7: Open your default messaging app and check whether you are still getting the same issue on your device.
Several of our users have already reported that their system UI has unexpectedly stopped once they try to turn on the safe mode on their devices. If you are also getting the same error on your smart device, follow our comprehensive guide for the “System UI has stopped” error in Android devices.
3. Reset Network Settings
If you have an unresponsive messaging app on your device, a faulty internet connection is the core issue. As most android devices now use dynamic IP systems these days, this error can even trigger if the device fails to fetch the right IP. In such cases, you need to manually reset the network settings on your device.
- Step 1: Tap on the “Settings” app to launch it on your android device.
- Step 2: Scroll down the newly opened app and click on the “General Management” option.
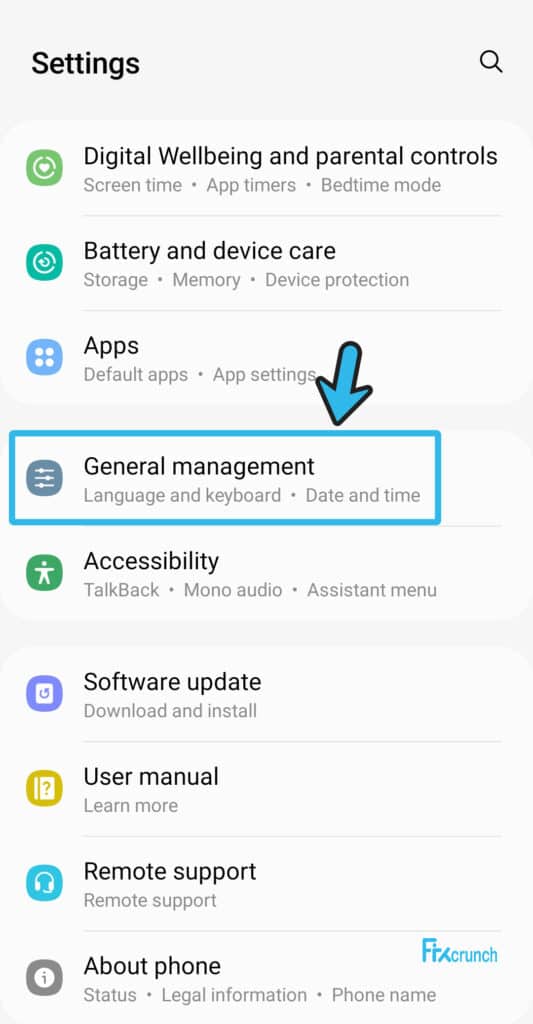
- Step 3: Once a new menu appears, click on the “Reset” button to start the procedure.
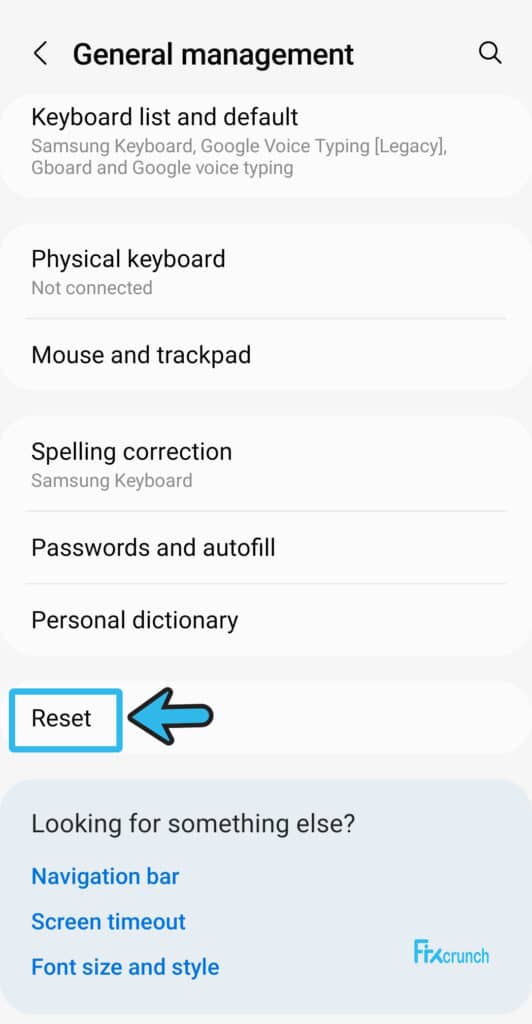
- Step 4: After getting another menu, tap on the “Reset Network Settings” option from the list.
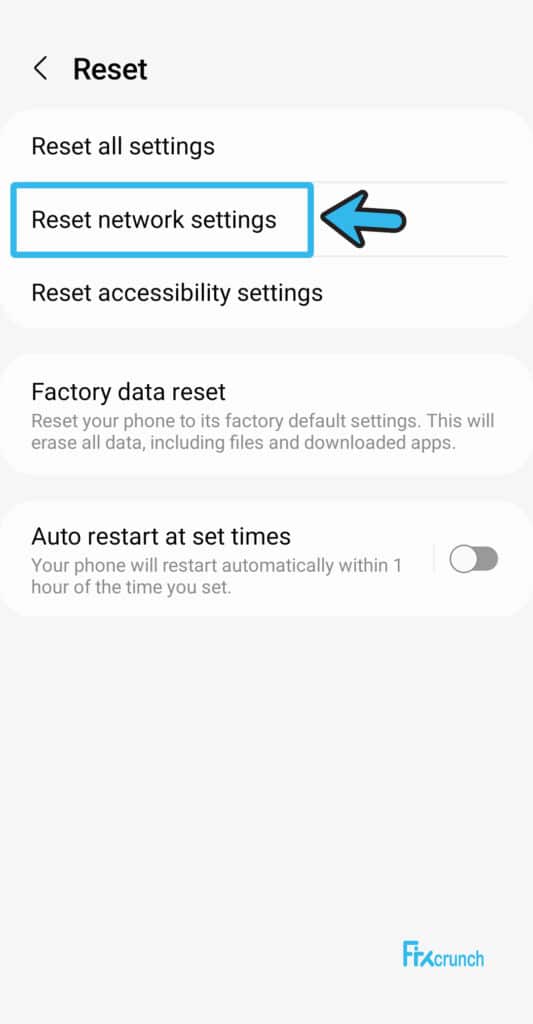
- Step 5: Wait until Android automatically flushes all the network configurations to reset the settings.
- Step 6: Once the connection is fully reset, open your default messaging app and try to send a text message.
Many of our users have told us that they have started getting an IP settings error once they have tried to reset their network settings, primarily while they were connected to Wi-Fi. If you are also facing the same issue on your device, follow our comprehensive guide to fix the “Failed to obtain IP address” error on Android devices.
4. Force Stop The Messages App
If there is any cache error, particularly for the default messaging app installed on your device, you may get an error where the messaging app is not working in Android. In such cases, you need to manually “Force Stop” the default messaging app to give it a new start without any cache bug.
- Step 1: Locate the icon of your default messaging app on your menu.
- Step 2: Now, tap and hold the icon until you get a popup selection menu.
- Step 3: Tap on the “i” option from the list and select the “Force Stop” option.
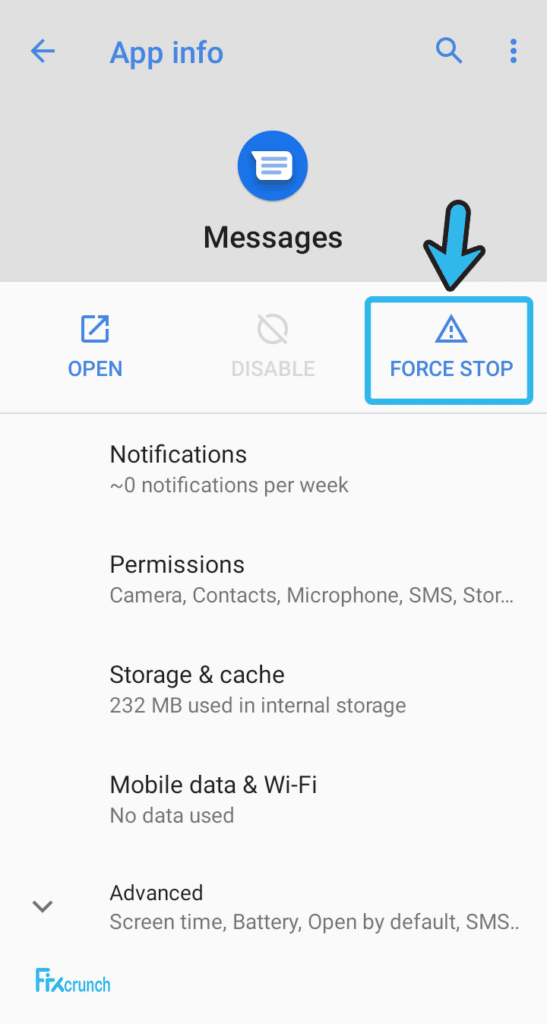
- Step 4: You can also navigate to your “Settings” app and then click on the “Apps & notifications” option.
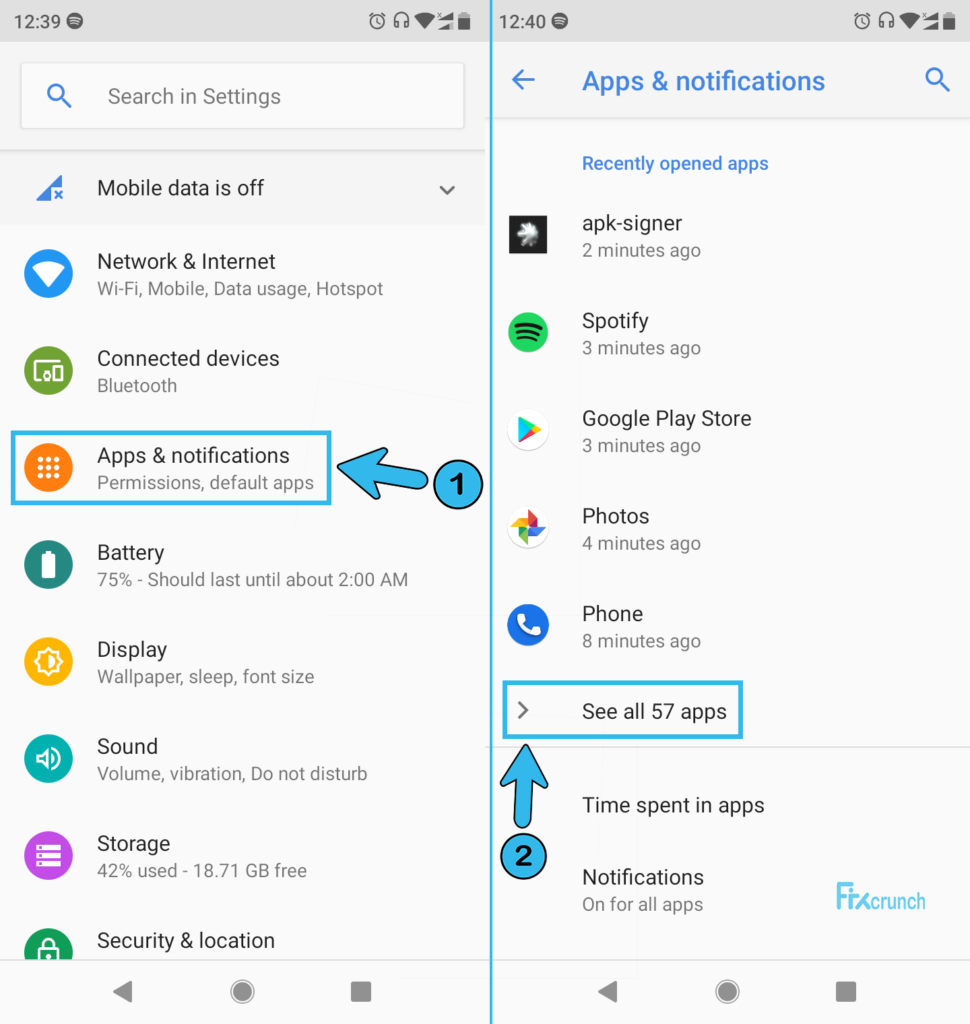
- Step 5: Once the list of installed Messages apps appears, tap on the “App info” or “See All Apps” option from the list, depending on your smartphone model.
- Step 6: Now, select the default messaging app and further click on the “OK” button.
- Step 7: Once your messaging app resets fully, relaunch the app and try to send a message.
If restarting the default messaging app itself doesn’t solve the error, you may need to force-stop the messaging app and then reboot your system. And in that way, you can also flush the cache files on the messaging app when it is force stopped on your device.
5. Clear The Cache Of The Messages App
If your default messaging app doesn’t rely on the internet connection but only sends text messages, the problem may lie in the cache files of the app. At times, congested cache files force an app to malfunction. And in such cases, you need to manually clear the cache files of your messaging app.
- Step 1: Click on the “Settings” app on your android device to launch it.
- Step 2: Once the app opens, scroll down the page and tap on the “Apps & notification” option.
- Step 3: Now, click on the “App info” from the newly opened menu.
- Step 4: Select the “Messages” app and further click on the “Storage & Cache” option.
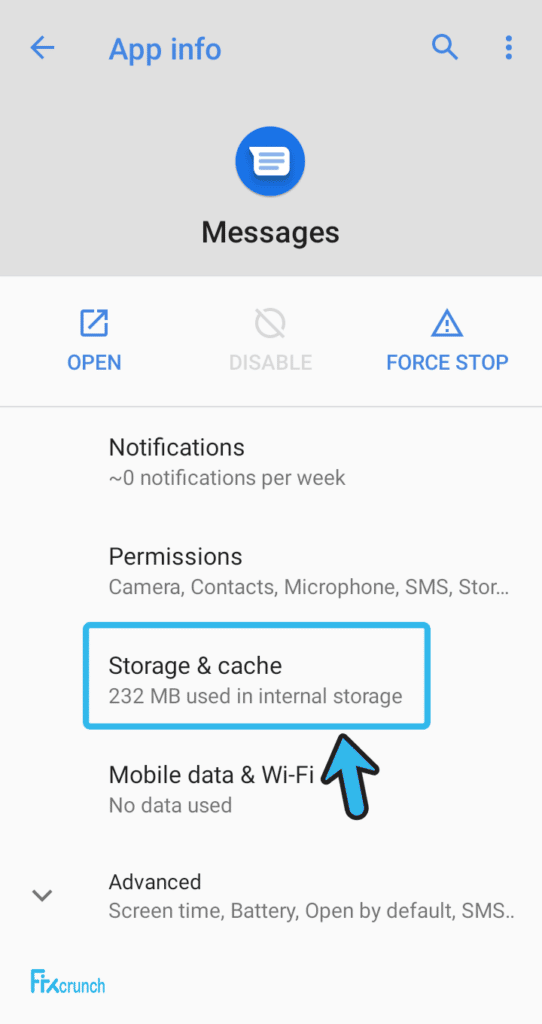
- Step 5: Tap on the “Clear Cache” option to remove all the cache files related to your default messaging app.
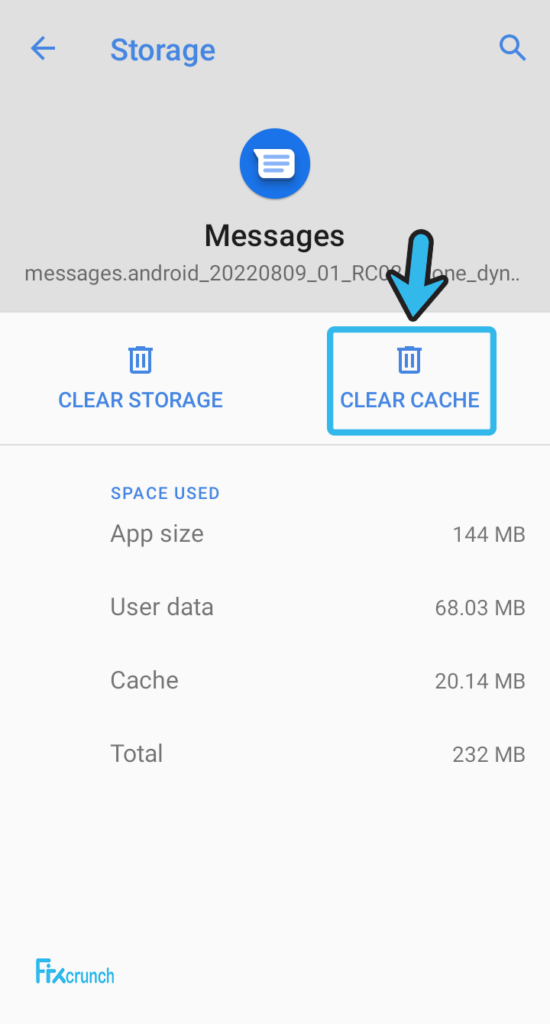
- Step 6: Once the operation is done, relaunch your messaging app and check whether you are still getting the same issue.
If you get any advanced popup options to secure your stored messages while resetting, you must enable it to safeguard your data. However, it is also better to copy the important messages to a different backup drive if you have to reset the messaging app on android devices.
6. Update The Messages App
If the messages app in Android is not working on your device, you are probably using an obsolete version of the app. And to sort it out, you need to manually update the messaging app. Updating all the apps installed on your system in a timely manner will fix various errors and bugs on your device.
- Step 1: Click on the “Google Play Store” icon on the menu of your android device to launch it.
- Step 2: Once the app opens, navigate to your default messaging app.
- Step 3: long-press on the messaging app unless a new set of options appears.
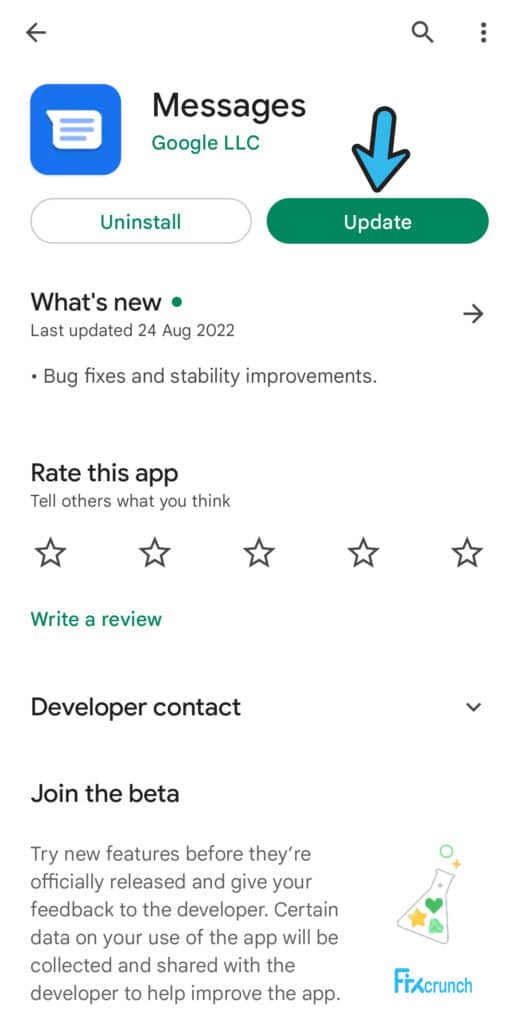
- Step 4: Tap on the “Update” button from the list to initiate the operation.
- Step 5: Let Android automatically find and install the updated version of the app.
- Step 6: Reboot your device once your default messaging app is fully updated.
Many of our existing users had reported to us that their settings app stopped all of a sudden when they tried to update their android device. If you are also facing the same issue on your device, follow our step-by-step guide to fix the “unfortunately, the settings app has stopped” error in Android devices.
7. Turn Off Battery Optimization For The Messages App
Battery optimization now comes with every android device these days. This feature helps all the apps to properly use the battery power to give it an optimum boost. However, at times, this feature can directly interfere with the apps. So, you need to turn it off and then check the messaging app.
- Step 1: Tap on the “Settings” app on your device to launch it.
- Step 2: Once the app opens, scroll down the page, and click on the “Apps and Notifications” option.
- Step 3: Now, click on the “Apps” option to fetch the full list of installed apps.
- Step 4: Navigate to your default messaging app from the list and tap to select it.
- Step 5: Once the “App info” page opens, click on the “Battery” option from the new set of menus.
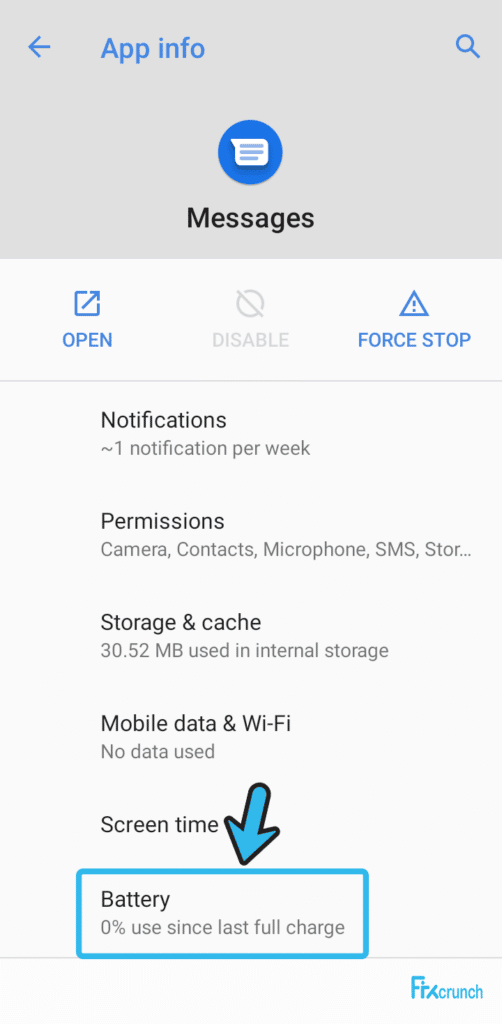
- Step 6: Tap on the “Don’t / Not optimize” button to disable it.
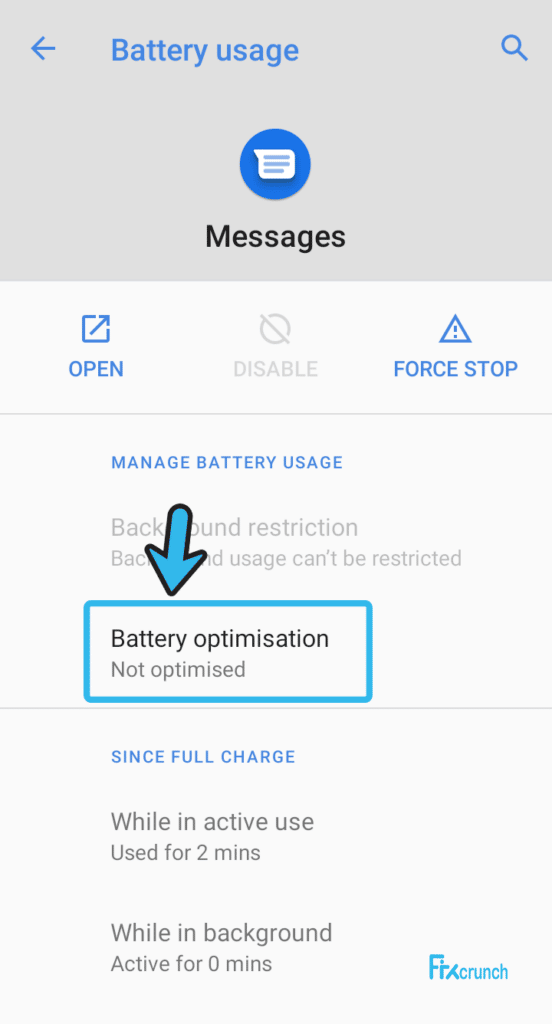
- Step 7: Now, relaunch your messaging app and check whether you are still getting the same error.
Once you sort out the error where the messages app is not working in Android, you must enable battery optimization on your device. Otherwise, you may face a drop in battery life and performance in the long run. Besides, you may not get the optimum user experience as well.
7+ Advanced Fixes If The Messaging App Is Not Working On Android Devices
If none of the generic methods are enough to solve it and still the messages app in Android is not working, there is no other way than resorting to the more advanced fixes. However, try these steps with extreme precaution or under an expert’s supervision.
8. Clear The Cache Files Of Google Play Services
Not only the messaging app, but you may also get an unresponsive app if you have any cache error on your Google Play Services app, as it culminates all the apps on your device. So, besides the messaging app, you may also need to clear the cache of your Google Play Service to fix it.
- Step 1: Close all the running applications on your device and come to the “Home Screen,” where all the app icons are displayed.
- Step 2: Now, tap on the “Settings” app (gear icon) to launch the app.
- Step 3: Scroll down the newly opened page and select the “Apps” or “Apps & Notifications” option, depending on your smartphone variant.
- Step 4: Tap on the “Application Manager” option from the new list of menus.
- Step 5: After a new list appears, tap on the “Google Play Service” app.
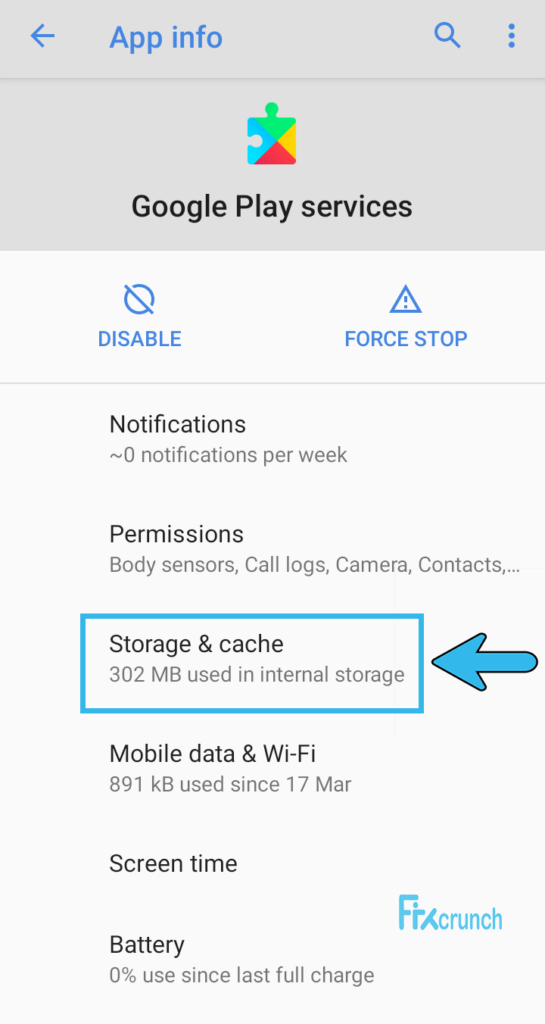
- Step 6: Now, tap on the “Storage & Cache” option from the new menu.
- Step 7: Once you get a new set of options, tap on the “Clear Data” or “Clear Storage” option, depending on your smartphone type.
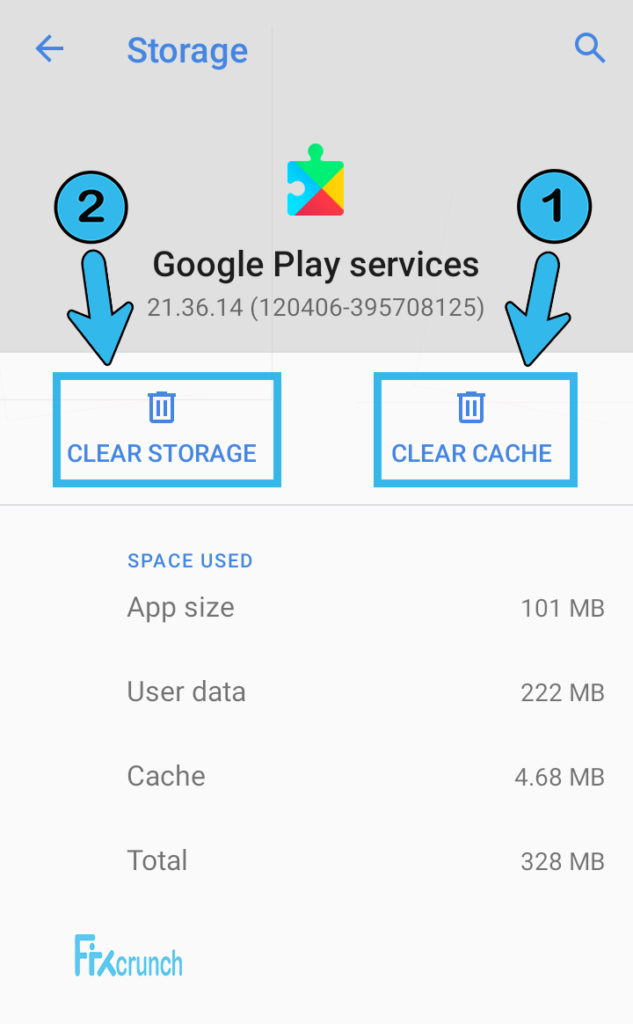
- Step 8: Once the cache files are all cleared, reboot your device.
Some Android users have started getting an unknown R008 error on their smart devices once they have cleared the cache files of their Google Play Service app. If you are also facing the same problem on your system, follow our step-by-step guide to fix the “Error code R008 ” on Android devices.
9. Update Google Play Services
If you are using an obsolete variant of the Google Play Service app where the update is long due, you may face an error where the messages app in Android is not working. In such cases, you need to manually update the Google Play Service app to ensure a smooth user experience on your device.
- Step 1: Tap on the “Settings” app (gear icon) on your home screen to launch the app.
- Step 2: Once you get the new set of options, tap on the “Apps & Notification” option.
- Step 3: Now, click on the “App info” or “See All Apps” option, depending on your smartphone variant.
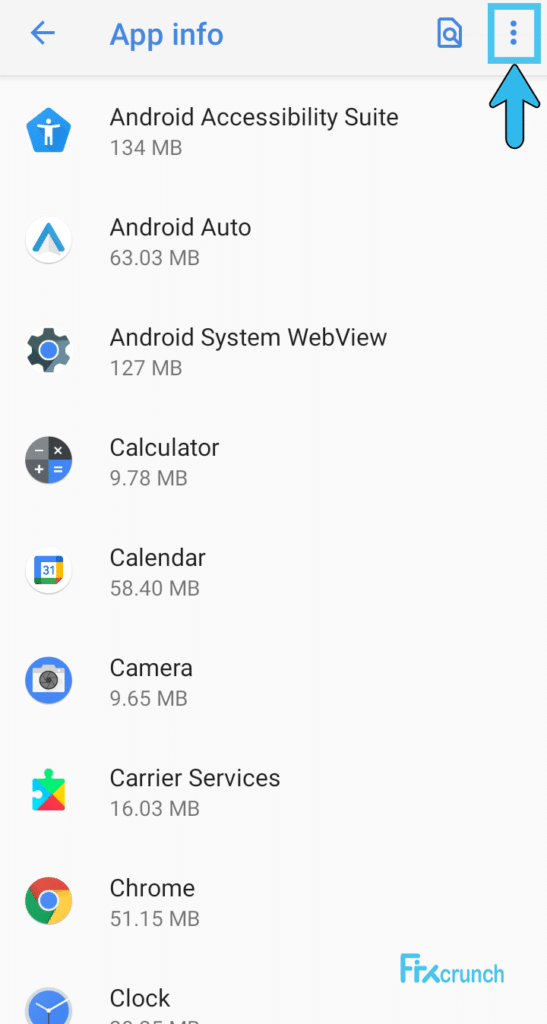
- Step 4: Locate and tap on the “Three Dots” icon located at the top-right corner of the new page.
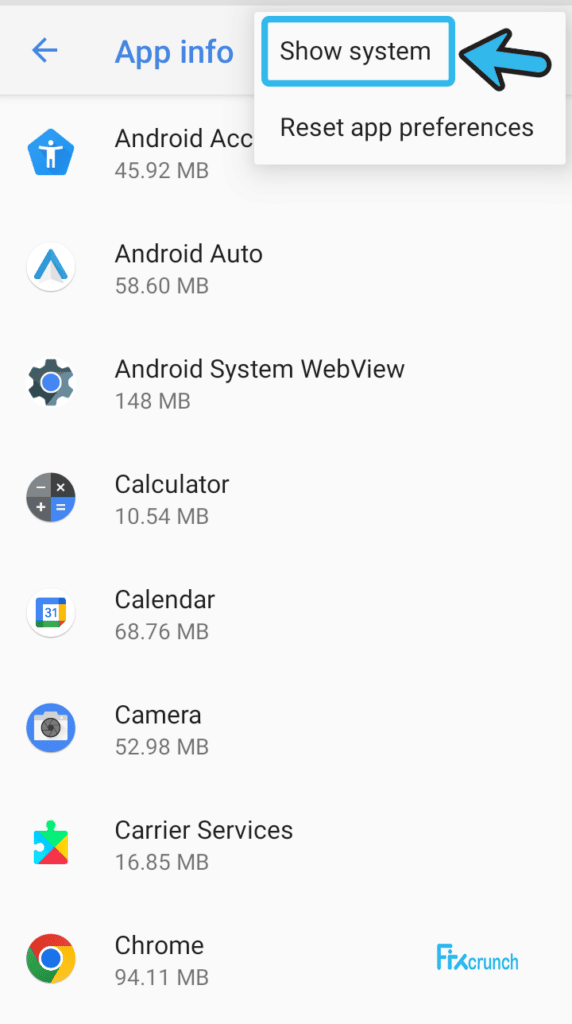
- Step 5: Once a new menu appears, tap on the “Show system” option from the list.
- Step 6: Now, select the “Google Play Service” app from the list.
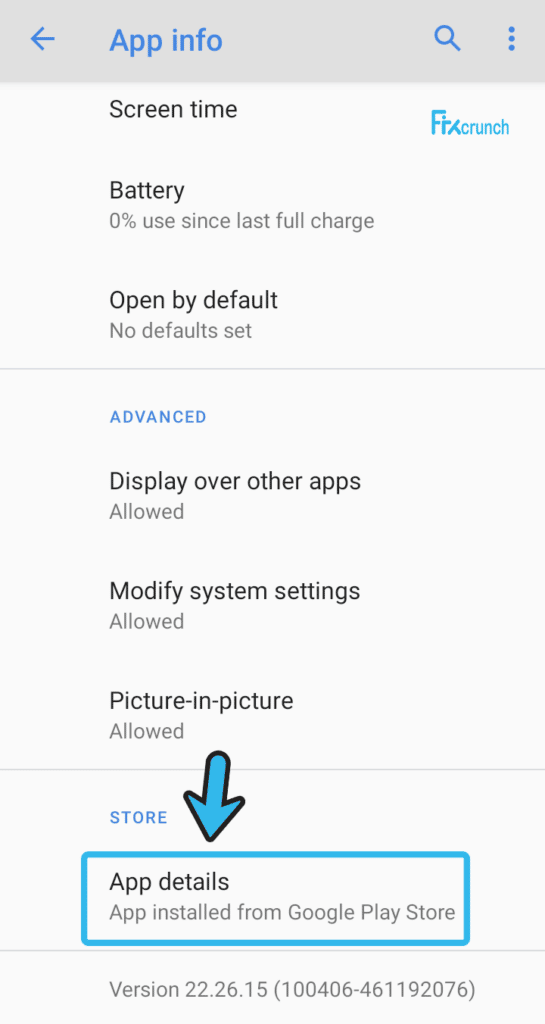
- Step 7: Scroll down and tap on the “Store” option and further tap on the “App details” option.
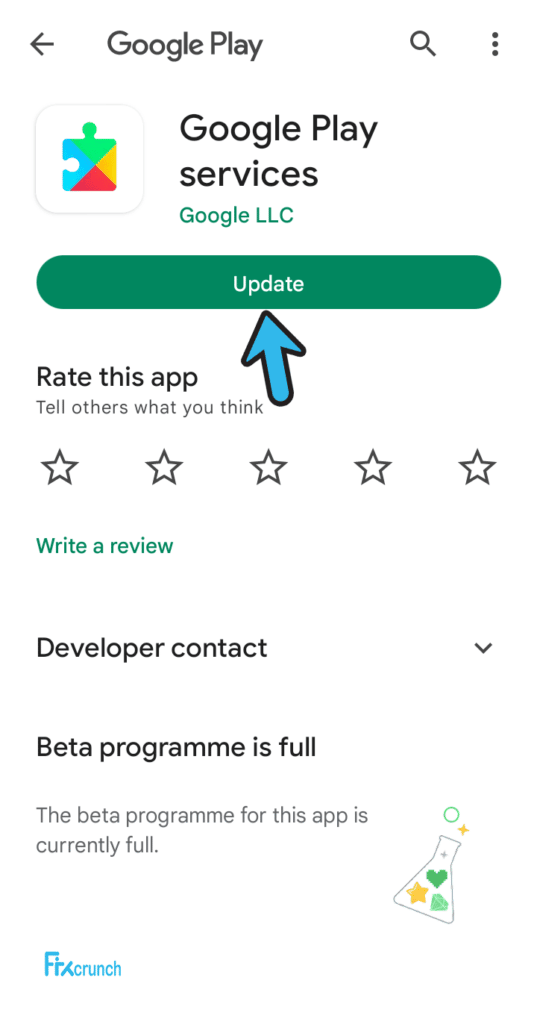
- Step 8: Finally, tap on the “Update” option to initiate the procedure.
- Step 9: Once the app is completely updated, reboot your device.
Several of our users have reported to us that their Instagram app stopped working completely once they tried to update it. If you are also facing the same issue on your smartphone, follow our detailed guide to fix the “Problem With Your Request On Instagram” error in Android devices.
10. Update Your Android OS
If you are using an outdated version of the Android OS itself, you may get a malfunctioning messaging app on your device. And to fix it, you need to update your Android OS first. Updating it will not only resolve this error but will also fix all the minor glitches on your android device.
- Step 1: Close all the running applications on your device and come to the “Home Screen,” where all the icons are displayed.
- Step 2: Now, tap on the “Settings” app (gear icon) to launch it.
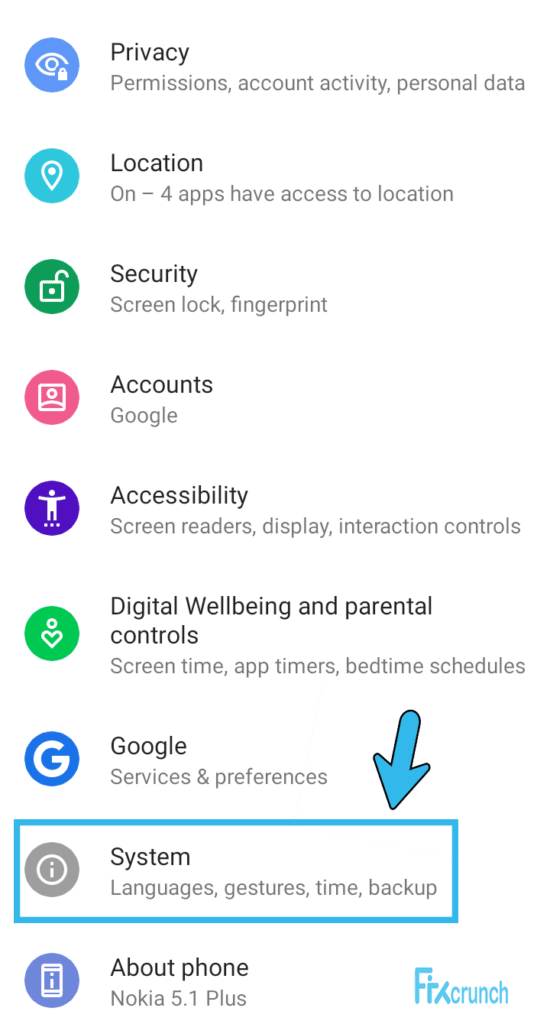
- Step 3: Scroll down the newly opened page and tap on the “About Phone” or “System Information” option, depending on your smartphone variant.
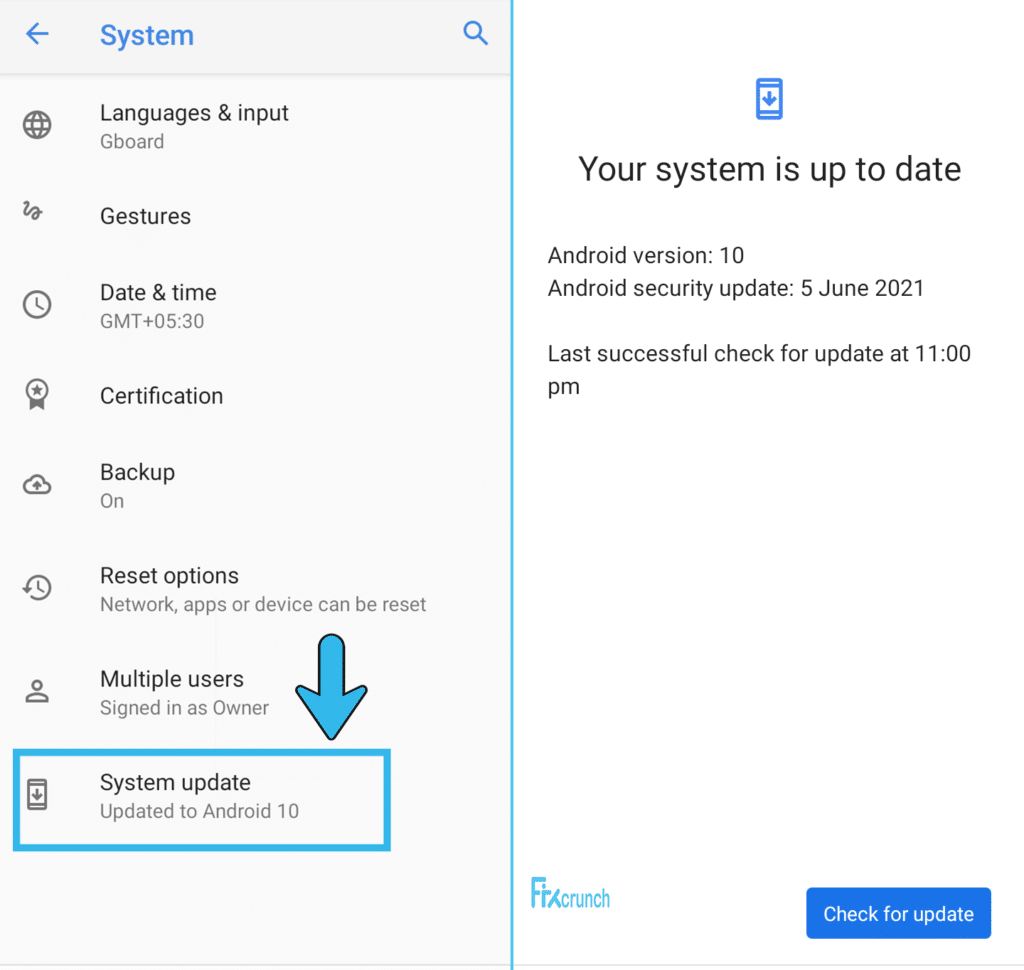
- Step 4: After a new page opens, scroll down the page, and tap on the “System Updates” option.
- Step 5: Once you get a prompt message, tap on the “Download” or “Install” button.
- Step 6: Let your Android automatically find and install the latest update patch on your device.
- Step 7: Once your OS is fully updated, launch the default messaging app and check whether you are still getting the same error on your device.
The latest android update patch may not support your device if you are using an old one. In such cases, you must install the last supported update patch on your device to fix it. However, you need to manually check for updates in a timely interval to keep your smartphone in perfect condition.
11. Set Messages As Your Default Messaging App
Many people don’t know how to refresh text messages on Android, as they use a third-party app to deliver their text messages. However, it is better to make your preinstalled message app your default text messaging app to get the optimum performance from your Android OS.
- Step 1: Close all the running applications from your device and come to the home screen.
- Step 2: Tap on the “Settings” app (gear icon) to launch it on your device.
- Step 3: Once the app opens, scroll down the page, and tap on the “Apps & Notifications” option.
- Step 4: Tap on the “Advanced” option from the new set of options.
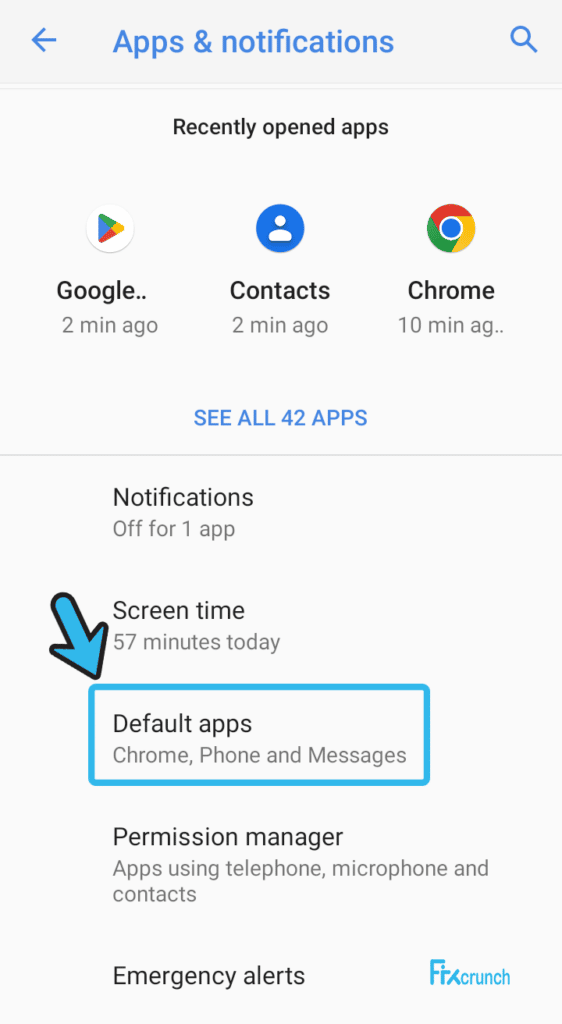
- Step 5: Now, tap on the “Default apps” option from the new menu.
- Step 6: Select the “SMS app” option first and then select the “Messages” option from the list.
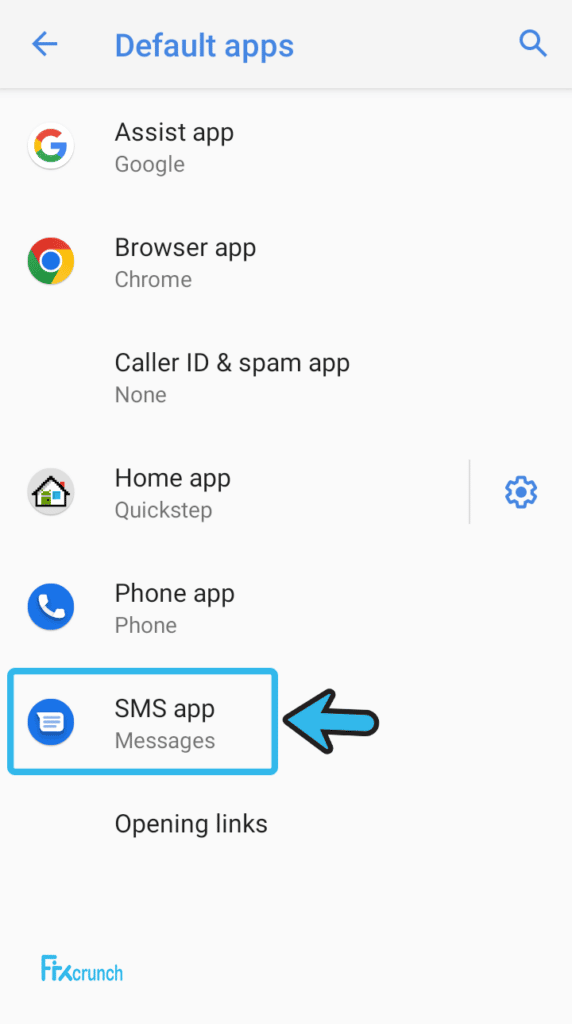
- Step 7: Exit from the “Settings” app and reboot your device.
Many of our existing users have reported to us that they have started getting an error code 907 on their devices once they have shifted from a third-party messaging app to the default messaging app. If you are facing the same issue on your smartphone, follow our comprehensive guide to fix the “Error code 907” in Android devices.
12. Stop All The Running Apps On Android
While using your android device, several apps and linear processes run in the background to ensure an optimum user experience. However, at times, the apps interfere with each other and cause various errors, especially if you have too many apps opened on your device. So, you need to stop all the running apps first.
- Step 1: Navigate to your home screen, where all the app icons are displayed.
- Step 2: Now, long-press the home button to initiate the “Task Manager” app on your device.
- Step 3: Tap on the “Clear All” option to close all the running applications.
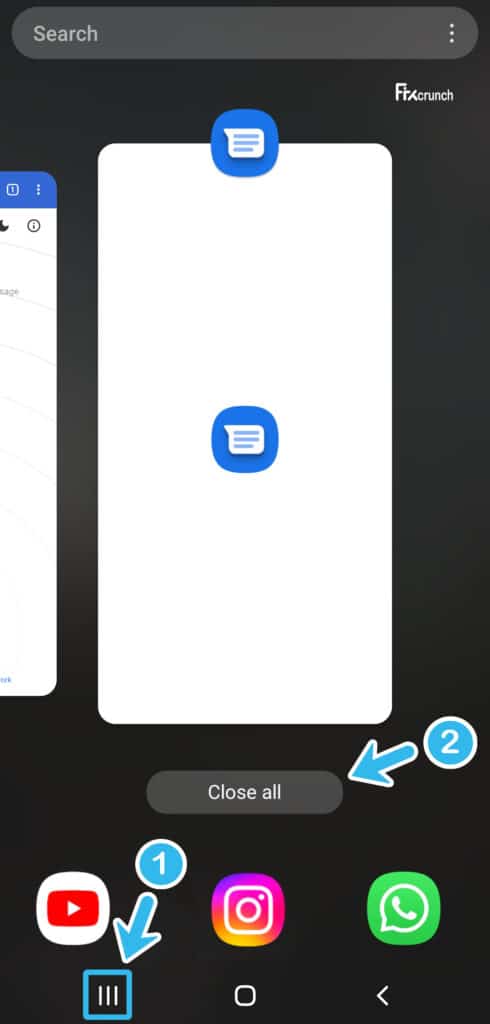
- Step 4: Tap on the “Settings” app (gear icon) to launch it on your device.
- Step 5: Once you get a new set of options, tap on the “Apps” button.
- Step 6: After the full list of running apps appears, select all the applications and tap on the “Force Stop” option.
- Step 7: Once all the running apps are closed, launch your default messaging app and check whether you are still getting the same error.
Several of our existing users have reported to us that their apps were not installed once they had force-stopped all the running applications and background processes from their devices. If you are also facing the same error on your android phone, follow our detailed guide to fix the “App not installed” error on Android devices.
13. Delete Cache Partition In The Recovery Mode
If the messages app in Android is not working, the problem may lie in the memory unit on your device. If there is any error or bug in the cache partition, the messaging app may fail to incorporate the cache files while running. So, in such cases, you need to manually delete the cache partition from your device.
- Step 1: Switch off the phone and allow a cool-off period of at least 2 minutes.
- Step 2: Now, press the “Volume Up” and “Power” buttons together until a new menu appears.
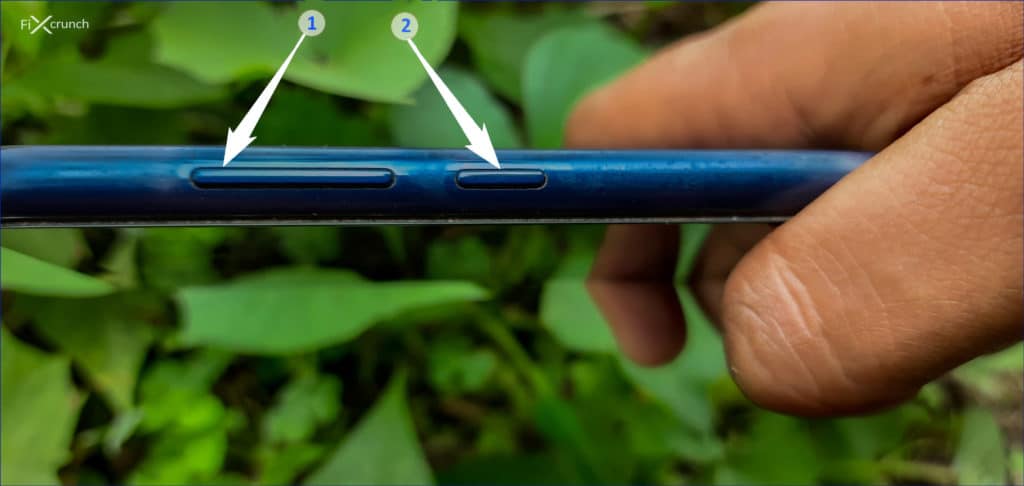
- Step 3: Once the new menu appears in the “Recovery Mode,” use the volume up and down button to navigate and the power button to select the options.
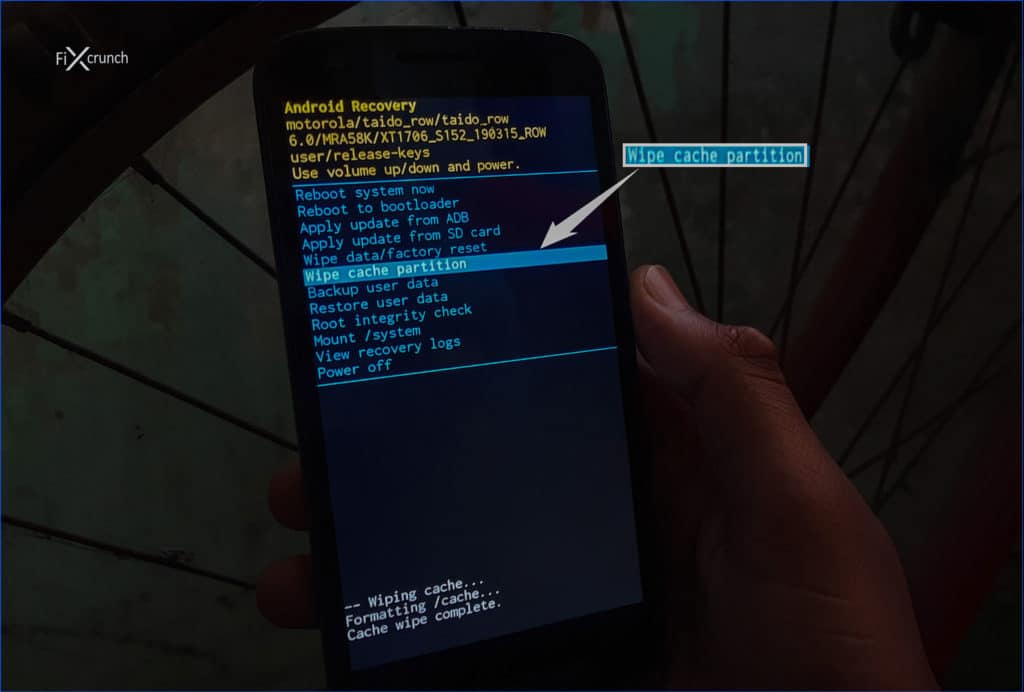
- Step 4: Select the “Wipe cache partition” option from the newly opened list.
- Step 5: Once you get the completion popup, reboot your device.
- Step 6: Once your Android fully loads in the normal mode, open your default messaging app and try to send a text message.
You shouldn’t delete the cache partition too often. Deleting your cache partition will remove all the existing cache files from your device. And it can force logout from multiple apps installed on your smartphone. Besides, you must also keep a backup to safeguard all your data.
14. Factory Reset Your Android Device
If none of the methods we have mentioned above are effective in resolving the unresponsive messaging app error from your android device, there is no other way than factory resetting your entire phone. However, it will automatically erase all the third-party apps from your device.
- Step 1: Tap on the “Settings” app (gear icon) to launch the app on your device.
- Step 2: Now, scroll down the newly opened page and tap on the “System” option.

- Step 3: Select the “Reset” option from the new list to initiate the procedure.
- Step 4: After you get a new set of options, tap on the “Erase all data” option from the list.
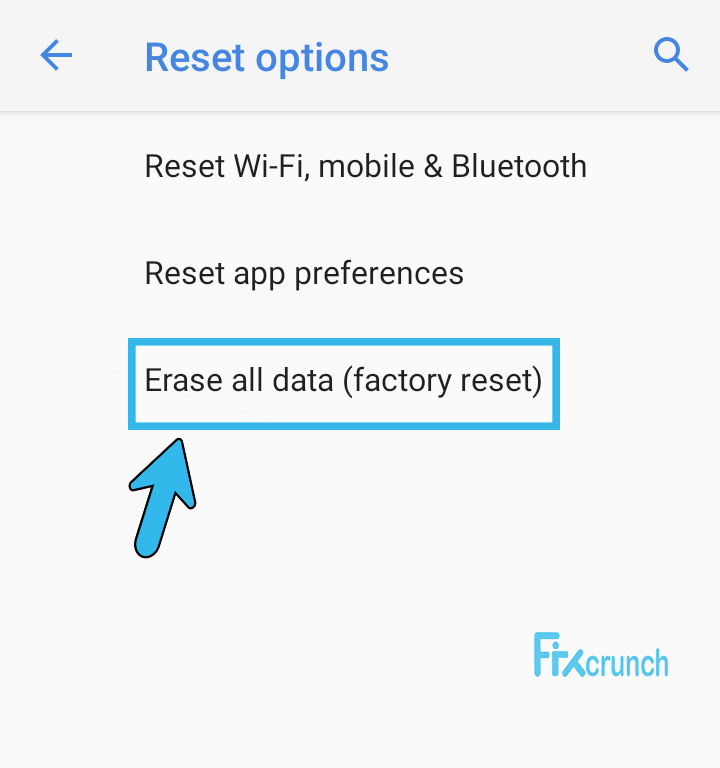
- Step 5: Now, navigate to the bottom of the new menu and tap on the “Reset Phone” option.
- Step 6: Tap on the “Delete all data” option from the menu.
If you are using a Samsung device, your options may be a bit different than other android phones, mainly due to their use of a different UI. However, you can do it easily by following the steps mentioned below.
- Step 1: Come to the “Home Screen” of your Samsung device and tap on the “Settings” app (gear icon).
- Step 2: Once the app launches, tap on the “General Management” option from the menu.
- Step 3: Now, navigate to the bottom of the page and tap on the “Reset” option.
- Step 4: Tap on the “Factory Reset” option from the new menu to initiate the procedure.
- Step 5: Finally, tap on the “Reset” button at the end of the page.
You should remember your Samsung user ID and password before trying this step, as the device may prompt to enter the credential before it can finally factory reset the device. If you have forgotten your login credential, it is better to recover them through the “Forget my password” option.
Conclusion
Trying all the generic fixes we have mentioned above is perfectly safe for any user, as it doesn’t need any expert guidance. However, if you have to resort to advanced fixes, it is better to keep a backup of all your installed apps and data on your device. You can use “Google Drive” or “Apple Drive” also to automatically keep a backup.
So, these are all the possible solutions we have if the messages app in Android is not working. If you think we have missed any effective method or if you know any other method to fix this issue, drop your suggestions and feedback in the comment.
FAQs
Q. How do I fix my messaging app on my Android?
First, you need to force-stop your default messaging app and then reboot your device to clear all the running caches. You must also clear all the cache files of the messaging app. Besides, you must also update both the default messaging app and the Google Play Service to fix it.
Q. Why do I keep getting the “Unfortunately, Messaging has stopped” error in Android?
This error message mainly occurs if there is any bug or error on your default messaging app. Besides, you may also get this error message if you have any cache file error on your device. Many android users have also faced it if they haven’t updated the app and the Android OS.
Q. Why is the Messages app not working?
As the messaging app mainly uses your carrier service rather than the internet connection, your message app may not respond if there is any settings error on your network options. Besides, your messaging app may also start malfunctioning if there are lots of cache files running or if the update is long due.
Q. How do I reset my messaging app?
Tap on the Settings app from your app drawer and then navigate to the apps and notification options. Now, click on the sell all apps option and select the default messaging app from the new list. Navigate to the advanced option and finally tap on the clear data option to reset your messaging app.
