Instagram is the most popular photo-sharing platform in the world right now, with a massive user base of nearly 1.5 billion. But don’t you feel like banging your head on the wall when you get the “there was a problem with your request on Instagram” error message repeated?
Instagram request errors can be fixed by updating the Instagram app and the Android OS. Besides, you also need to delete the cache files of the Instagram app and reset the app preferences on your device to fix it. You also need to set the right time, date, and region to fix this issue.
However, these are not all the possible solutions we have to fix this error. But, before we reveal those solutions, let’s understand what the primary reasons can be if you are frequently getting this error on your Android device.
Table of Contents
- 1 What Are The Primary Reasons Behind The “There Was A Problem With Your Request On Instagram” Error?
- 2 7+ Easy Fixes For The “There Was A Problem With Your Request On Instagram” Error
- 3 7+ Advances Fixes For The “There Was A Problem With Your Request On Instagram” Error
- 3.1 8. Reset The App Preferences
- 3.2 9. Reinstall Instagram Application
- 3.3 10. Temporarily Disable Your Instagram Account
- 3.4 11. Retrieve Instagram Through The “Forgot password” Option
- 3.5 12. Login With Your Facebook Account
- 3.6 13. Enable Two-Factor Authentication For Instagram
- 3.7 14. Factory Reset Your Android Device
- 4 How To Contact The Contact Instagram Help Center?
- 5 FAQs
- 6 Conclusion
What Are The Primary Reasons Behind The “There Was A Problem With Your Request On Instagram” Error?
Although Instagram has an extensive user base that never faces any login error or other glitches on the app, you can still get it. However, these errors on Instagram are mainly triggered for seven main reasons that are listed below.
- You are entering the wrong username or password while logging into your IG account.
- You are trying to log in from a new device that needs further authentication.
- The Instagram app installed on your android device is outdated and needs an urgent update.
- You have installed an obsolete version of the Android OS on your device.
- There are certain settings errors on your network configuration.
- You have entered the wrong date and time on your android device.
- There is a cache error on Instagram or the Google Play Service app.
Besides these seven primary reasons, you may also get this error if your Instagram account is banned or suspended for community guidelines violation. It can even occur if you still have not enabled the 2FA.
7+ Easy Fixes For The “There Was A Problem With Your Request On Instagram” Error
Before trying any pro methods that need advanced controls to resolve the “there was a problem with your request on Instagram” error on your Android device, you must try all the generic fixes first. And in most cases, these generic fixes are sufficient to resolve the IG errors in no time.
1. Restart Your Android Device
If there is any bug in any of the background apps, or if there is an issue with the cache files, you may also get the “sorry, there was a problem with your request on Instagram” error message. In such cases, you must reboot your device first to get rid of all the cache-related issues.
- Step 1: Navigate to the left or right side of your android device (depending on your smartphone model) and long-press the “Power” button.
- Step 2: Once a new selection menu appears, tap either on the “Switch Off” or “Turn Off” option.
- Step 3: Once your android device is completely turned off, keep it in idle mode for at least 2 minutes.
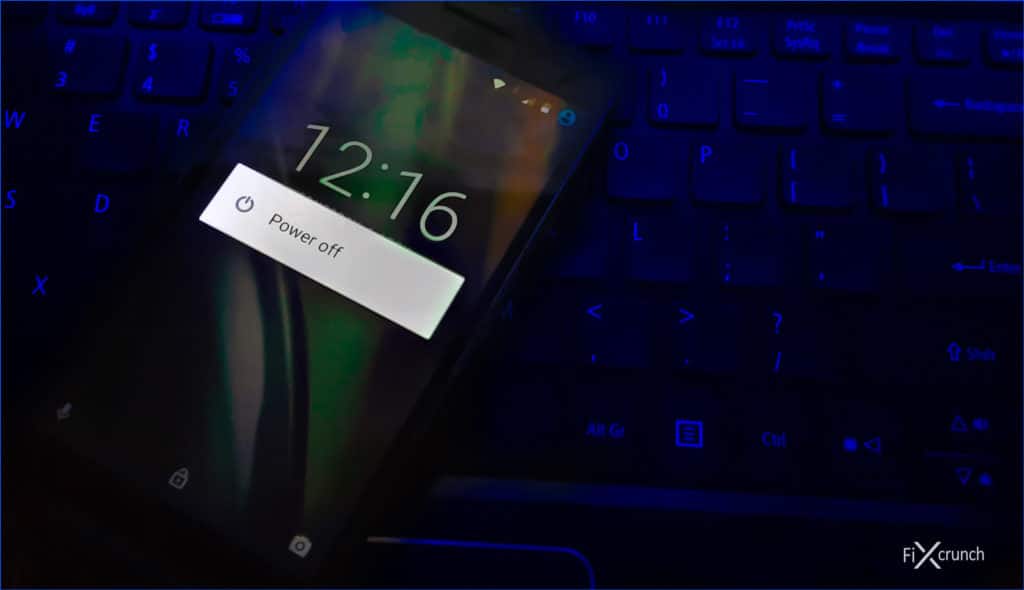
- Step 4: Long-press the “Power” button again until the new welcome menu appears on your android device.
- Step 5: Now, wait until the device fully restarts and all the applications load on the app drawer.
- Step 6: Open the “Instagram” app again and check whether you can log in this time.
Several of our users have reported to us that they have started getting an installation package error once they have tried to reinstall the Instagram app on their smartphones. If you are also facing the same issue, follow our step-by-step guide to fix the “There was a problem parsing the package” error in Android devices.
2. Check The Internet Connection Of Your Device
A faulty network connection or a mismatched network configuration can also trigger the “there was a problem with your request on Instagram” error message on your device. However, you can effectively solve it by checking and then resetting your network configuration again.
- Step 1: Tap on the “Settings” app (gear icon) to launch it on your device.
- Step 2: Scroll down the newly opened page and tap on the “General Management” option from the menu.
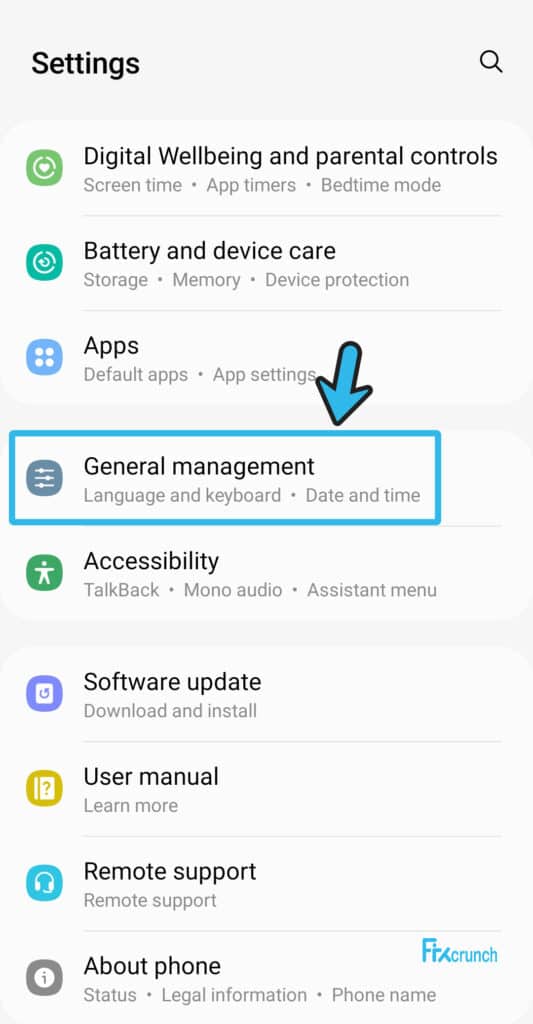
- Step 3: Once a new menu appears, tap on the “Reset” button to initiate the procedure.
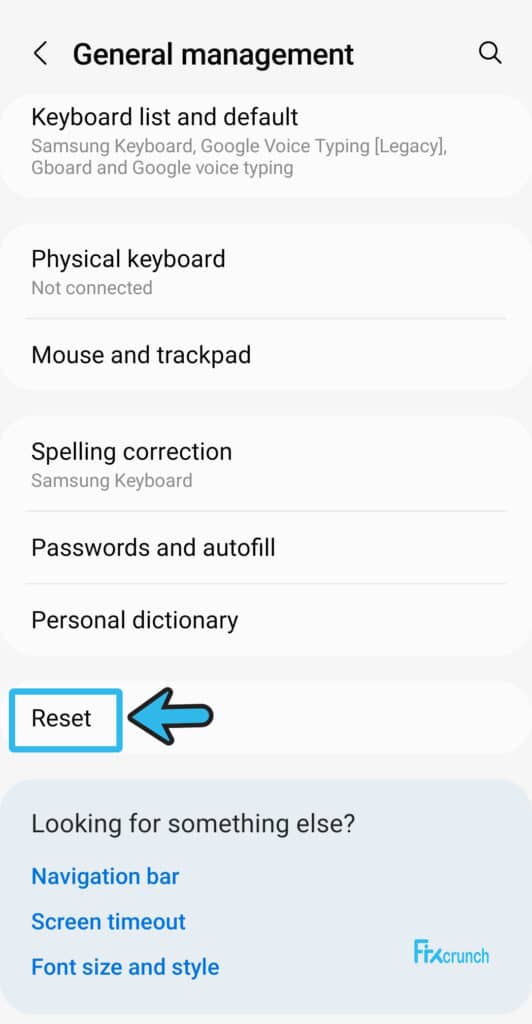
- Step 4: After you get another menu, tap on the “Reset Network Settings” option from the list.
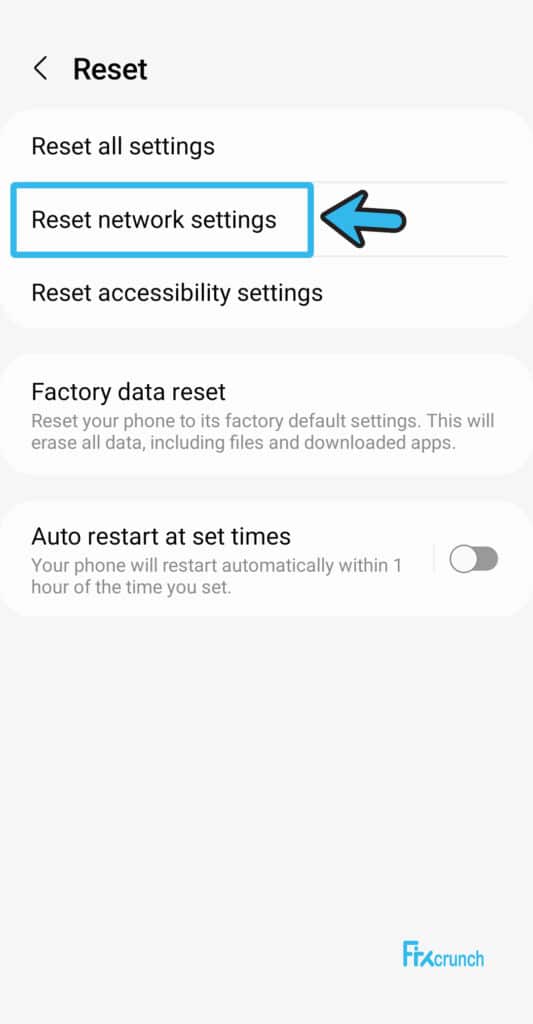
- Step 5: Now, wait until your android device automatically resets your network configuration.
- Step 6: Once the network connection is fully reset, launch the “Instagram” app and check whether you are still getting the same issue.
A few of our users have started getting an IP error once they have reset their network connection on their devices, especially while using a static IP connection. If you are also facing the same problem on your smartphone, follow our comprehensive guide to fix the “Failed to obtain IP address” error on Android devices.
3. Reconnect To Your Wi-Fi Connection
If your device is connected to your home Wi-Fi network and the network itself is weak or malfunctioning, you can get various Instagram-related bugs on your smartphone. However, you can easily fix it by disabling the Wi-Fi connection and then reconnecting to it again.
- Step 1: Toggle the “Notification” tray from the upside or downside on your smartphone.
- Step 2: Tap on the “Wi-Fi” option from the notification panel to turn it off.
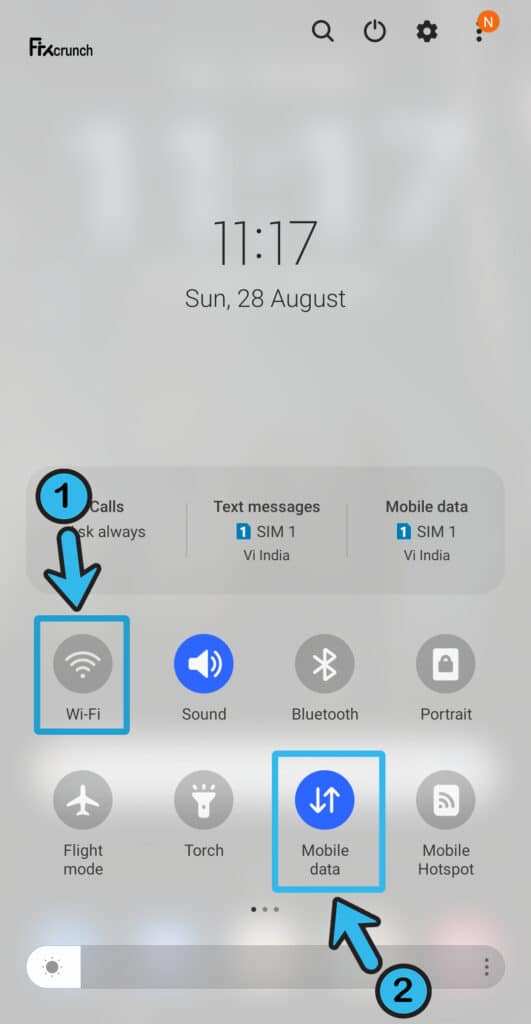
- Step 3: Tap on the “Mobile Data” option to turn on the data and let your device get the network connectivity from your sim card.
- Step 4: Wait for 2 minutes and tap again on the “Mobile Data” connection to turn it off.
- Step 5: Now, launch the “Settings” app (gear icon) on your device and further tap on the “Wi-Fi” option.
- Step 6: Long-press on the Wi-Fi network name to which you are trying to connect to.
- Step 7: Once your Wi-Fi connection is established, launch the “Instagram” app again and check whether you are facing the same issue.
Many times, you may also get various Instagram-related errors if your Wi-Fi frequency is not supported by your smartphone. So, you need to check which frequency your mobile supports perfectly, between 2.4 GHz and 5 GHz. And then connect with the right frequency to avoid this error.
4. Sync The Date And Time On Your Android Device
Not every Android user knows that their devices will work according to the time and region they have set on their device. Besides, it will also make the language default while you set the region. And if you have misconfigured the date and time on your android device, you may also get the “there was a problem with this request” error message.
- Step 1: Tap on the “Settings” app (gear icon) to launch it on your smartphone.
- Step 2: Scroll down the newly launched page and tap on the “Date & Time” option (You may also get it under the “System Settings” option on a few devices).
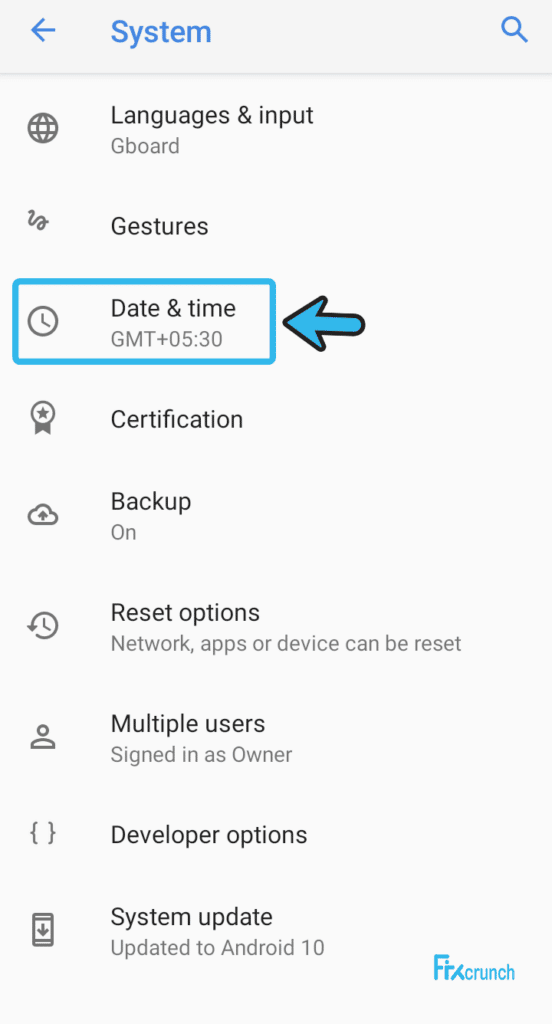
- Step 3: Now, navigate to the “Automatic Date & Time” option from the list and tap to activate it.
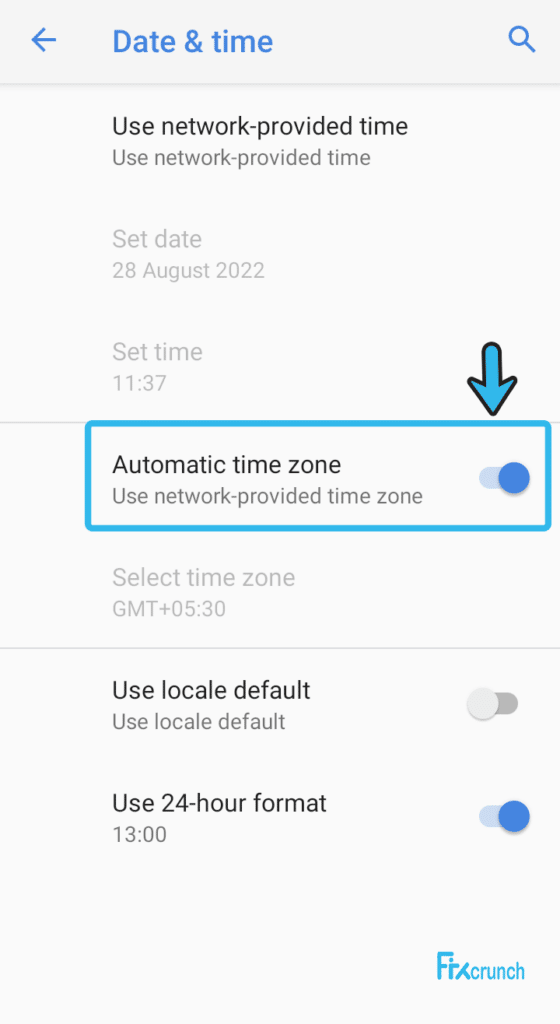
- Step 4: If that is not fetching the right time, tap on the “Edit” button beside the time option.
- Step 5: Put the right date, time, and region in the specific field and save it.
- Step 6: Now, close the “Settings” app and reboot your device.
- Step 7: Once your android device restarts, tap on the “Instagram” app again to launch it and then check whether you are still getting the same issue.
Many people forget to enter the correct date, time, and region after factory resetting their smartphone. However, it is absolutely necessary to enter those parameters correctly while you are setting up your phone for the first time or after a factory reset. However, you can also turn on the “Automatic” mode from the beginning.
5. Clean Up Your Instagram App Data And Cache
You may not know, but the cache files continuously gather information and store them in the background to ensure a smooth UI experience on any android device. And if you have too much cache accumulation on your device, you may get several issues related to the Instagram app.
- Step 1: Close all the running applications on your android device and navigate to the home screen where all the app icons are displayed.
- Step 2: Tap on the “Settings” app (gear icon) to launch it on your smartphone.
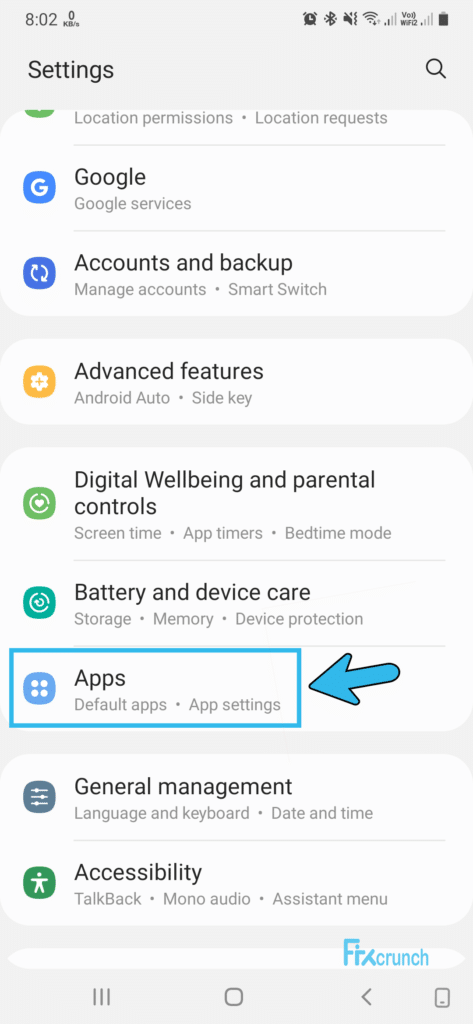
- Step 3: Scroll down and tap on the “Apps” option from the newly launched menu.
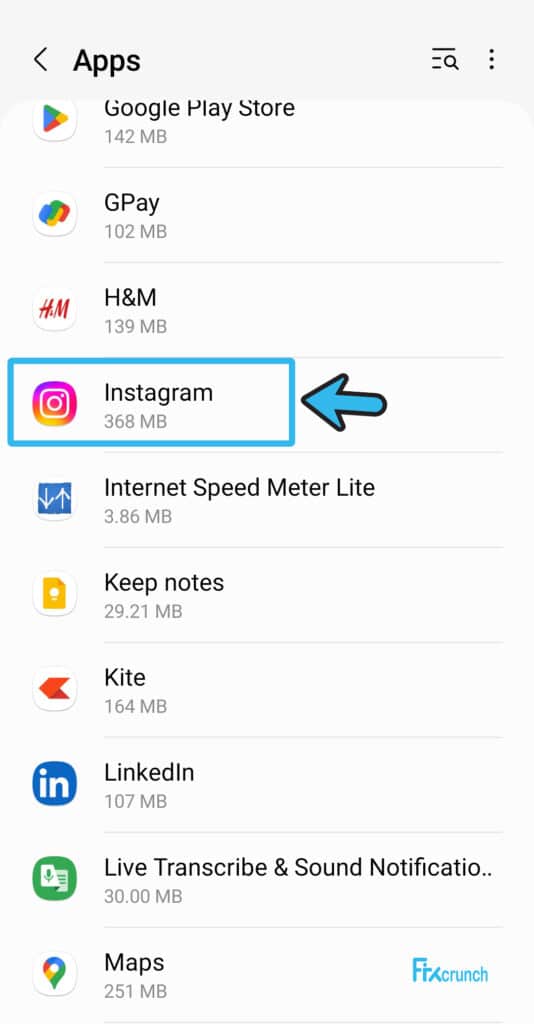
- Step 4: Once you get the list of apps installed on your system, tap on the “Instagram” app. Inside find “Storge” option & click on it.
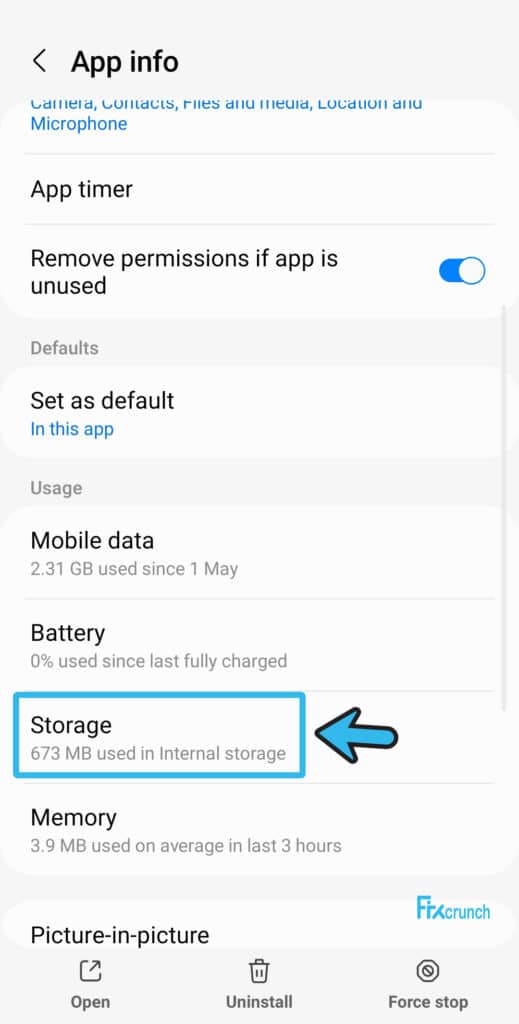
- Step 5: After you get a new set of menus, tap on either the “Clear Cache” or “Clear Data” option.
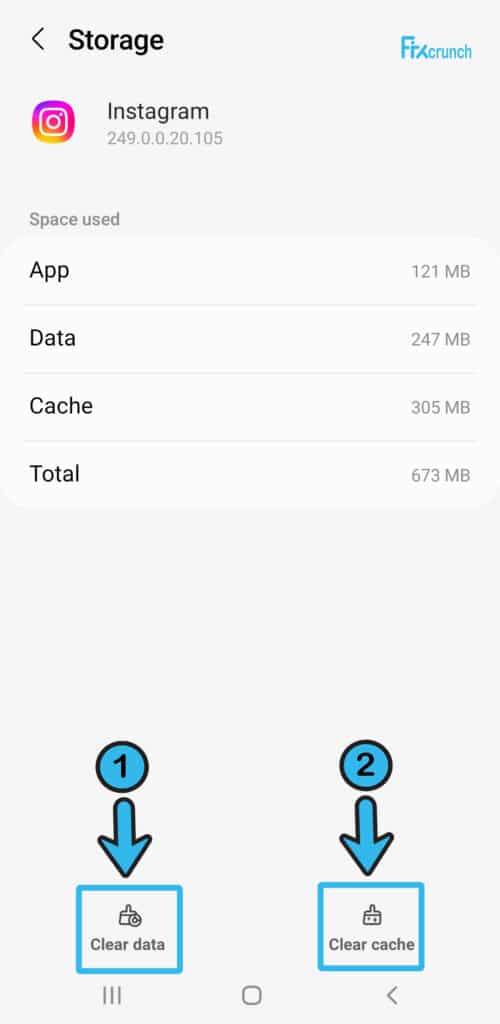
- Step 6: Let your android device automatically clear all the related cache files and reboot the device when it is done.
- Step 7: Once your device restarts, launch the “Instagram” app and check whether you can log in this time or not.
If your device can’t delete the cache files, you need to first check if the “Instagram” app is already running in the background. If yes, you need to close it and then reboot your device first to get rid of any interference issue. And once it restarts, you can then proceed with the steps.
6. Update The Instagram App
You may also get the “there was a problem with your request on Instagram” error message on your device if you have installed an obsolete version of the Instagram app that needs an urgent update. And you can easily update your IG app from the Google Play Store itself in a few simple steps.
- Step 1: Close all the running applications on your android device first and then fetch the app drawer.
- Step 2: Now, tap on the “Google Play Store” icon to launch it.
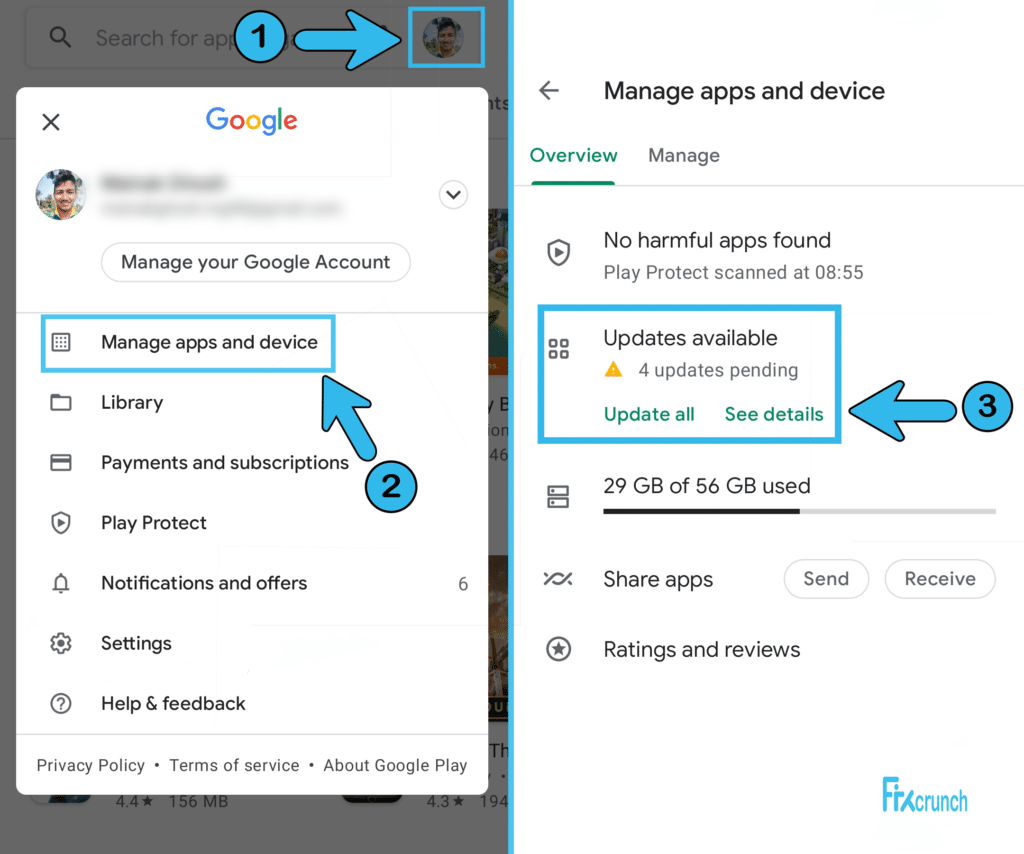
- Step 3: Once the app opens on your smartphone, tap on the “My Apps & Games” option from the list.
- Step 4: Navigate to the “Instagram” app from the new menu and tap on the “Update” button next to it.
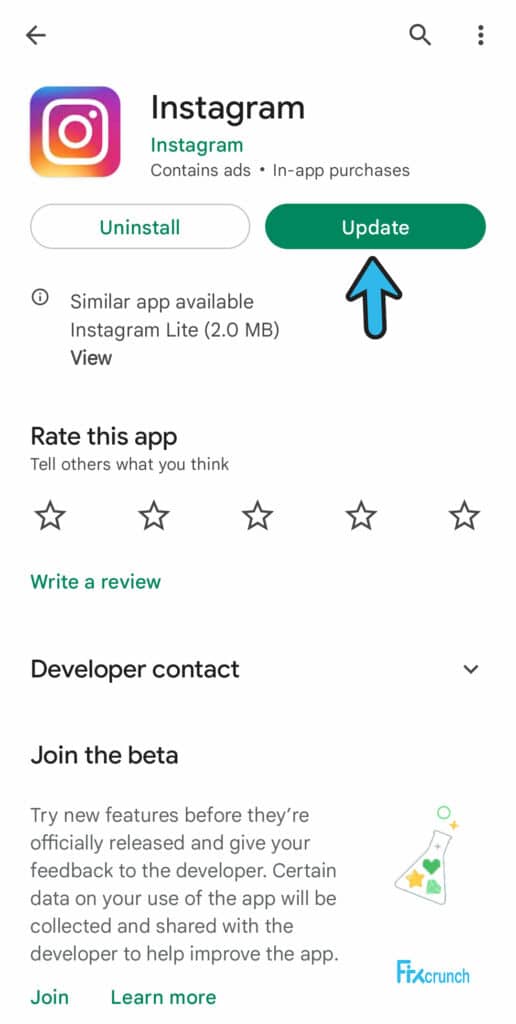
- Step 5: Let your Android automatically find and install the recent updates for the “Instagram” app.
- Step 6: Once the app is fully updated, reboot your device first.
- Step 7: After the device starts, open the updated “Instagram” app and check whether you are still getting the same issue.
Not just the Instagram app, you must always keep all the installed apps updated. And to do that, you can set a routine to update all the apps in a timely manner. Updating your apps will not get rid of minor bugs and errors but will also fix all the glitches and security loopholes from those apps.
7. Update Your Android OS
If you are still getting the Instagram professional account error even after updating the app, the problem may be triggering due to an obsolete version of Android installed on your smartphone. And to fix it, you need to manually update the Android OS first to resolve all the minor glitches.
- Step 1: Close all the background apps first and then come to the home screen where all the app icons are displayed.
- Step 2: Tap on the “Settings” app (gear icon) to launch it on your device.

- Step 3: Scroll down the newly opened page and tap on the “System Information” or “About Phone” option (depending on your smartphone variant).
- Step 4: Once you get a new menu, scroll down the page, and tap on the “System Updates” option from the list.
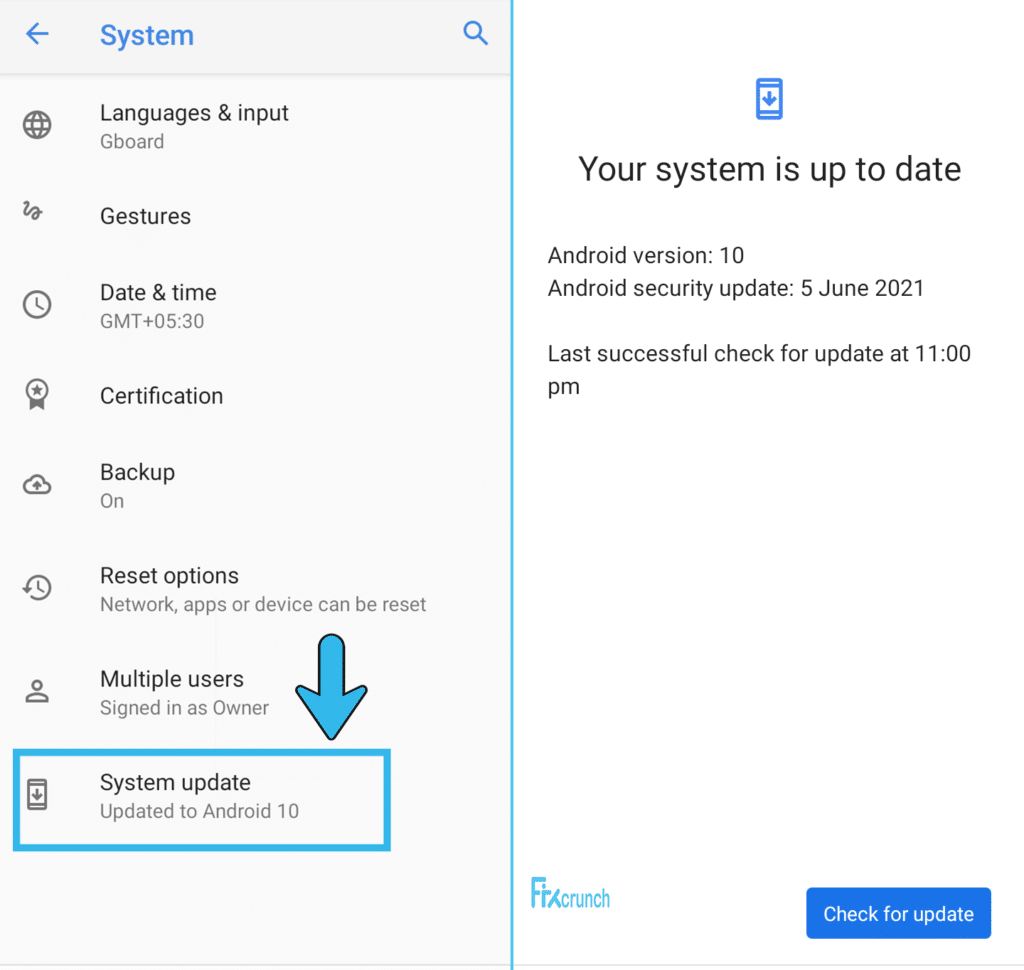
- Step 5: After you get a new prompt, tap on either the “Download” or “Install” option to initiate the process.
- Step 6: Let Android automatically download and install the latest update patch.
- Step 7: Reboot your system again once it is done and then check whether you are still getting the same error on your “Instagram” app.
If you are using an old smartphone, you may not be able to install the latest update patch for your Android OS. And in such cases, you need to install the last supported Android version for your device. However, it is better to turn on the “Automatic Update” option on your device.
7+ Advances Fixes For The “There Was A Problem With Your Request On Instagram” Error
If none of the generic methods can solve the “there was a problem with your request on Instagram” error on your Android device, there is no other way left than resorting to advanced fixes. However, you should try these steps with extreme precaution and only under an expert’s supervision.
8. Reset The App Preferences
All your installed apps and background processes can start interfering with each other if you have the wrong app preferences on your android device. So, to minimize the interference issue with the IG app in the background, you need to manually fix the app preferences on your smartphone first.
- Step 1: Close all the running applications and background processes on your smartphone.
- Step 2: Now, come to the home screen where all the app icons are displayed.
- Step 3: Tap on the “Settings” app (gear icon) to launch it on your device.

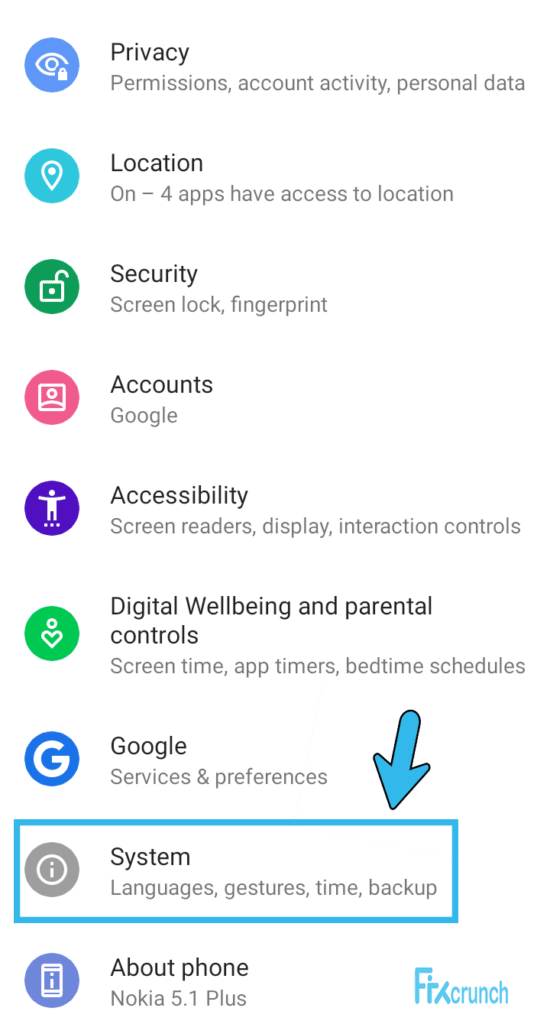
- Step 4: Once the app opens, scroll down the newly launched menu, and tap on the “System” button.
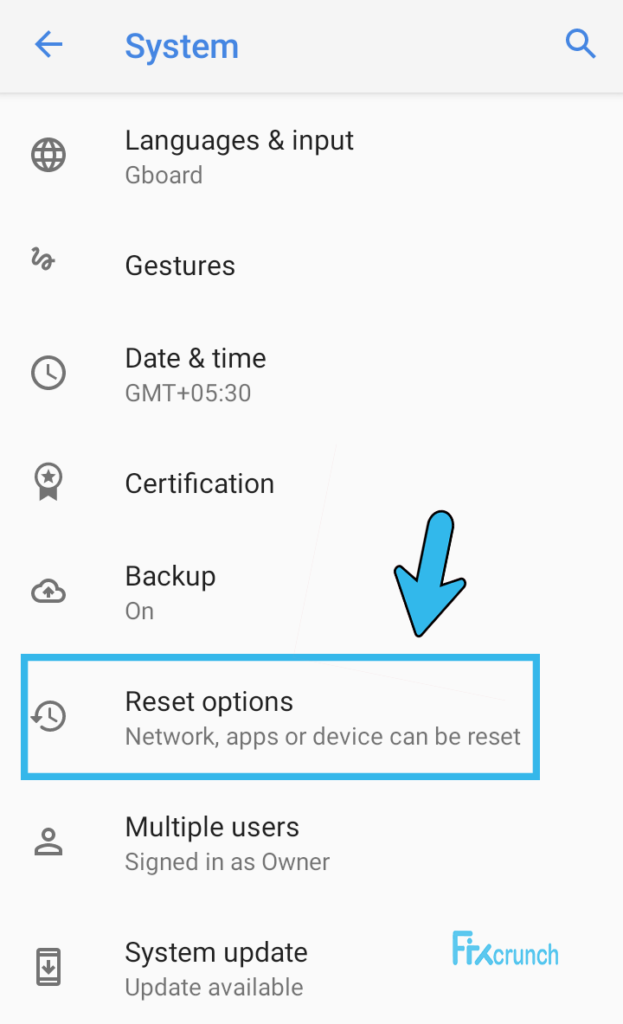
- Step 5: Now, scroll down the page and tap either on the “Reset” or the “Reset App Preferences” option (depending on your smartphone variant).
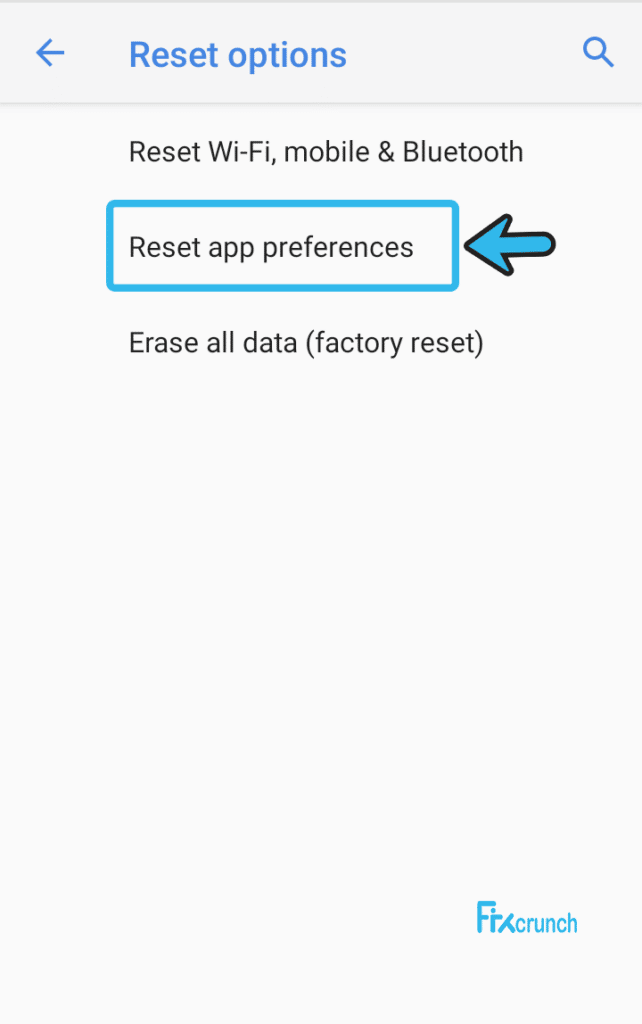
- Step 6: Once the preferences reset, reboot your device, and check the “Instagram” app again.
You may get an unresponsive settings app if you force reset the app preference on your android device, especially if you are using an old smartphone. In such cases, you can follow our detailed guide to fix the “Unfortunately, settings has stopped error in Android devices to fix it.
9. Reinstall Instagram Application
At times, you may get the “we couldn’t complete your request on Instagram promotion” error message on your device while you try to start any campaign. It mainly occurs if there is an internal issue with the app itself. And in such cases, you need to manually uninstall and then reinstall the app again.
- Step 1: Close all the running applications first and then come to the home screen where all the app icons are displayed.
- Step 2: Now, tap on the “Settings” app (gear icon) to launch it.
- Step 3: Navigate to the “App” option from the newly opened menu to launch it.
- Step 4: Scroll down and tap on the “Instagram” app from the list of apps.
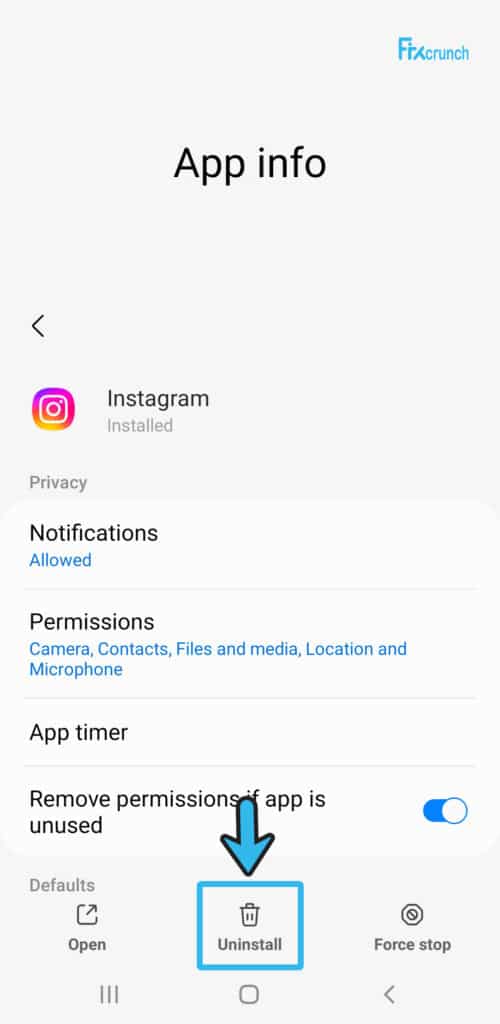
- Step 5: Once a new page appears, click on the “Uninstall” button to start the process.
- Step 6: After the app is completely removed, reboot your device.
- Step 7: Now, open the “Google Play Store” app and search for “Instagram” to get it.
- Step 8: Tap on the “Install” icon and let Android automatically install the IG app on your device.
A few of our users have reported getting an app installation error once they have tried to reinstall the Instagram app after uninstalling it. If you are also facing the same problem on your smartphone, follow our step-by-step guide to fix the “App not installed” error in Android devices.
10. Temporarily Disable Your Instagram Account
If you are frequently getting the “there was a problem with your request on Instagram” message on your device even after reinstalling it, the problem may lie in your IG account itself. And in such cases, you must temporarily disable your Instagram account and then reactivate it after 12 hours.
- Step 1: Launch the “Instagram” app on your phone by tapping the app icon on your app drawer.
- Step 2: Once your Instagram account opens, navigate to the “Profile” option.
- Step 3: After a new set of menus launches, tap on the “Edit Profile” button.
- Step 4: Now, tap on the “Temporarily disable my account” option from the menu.
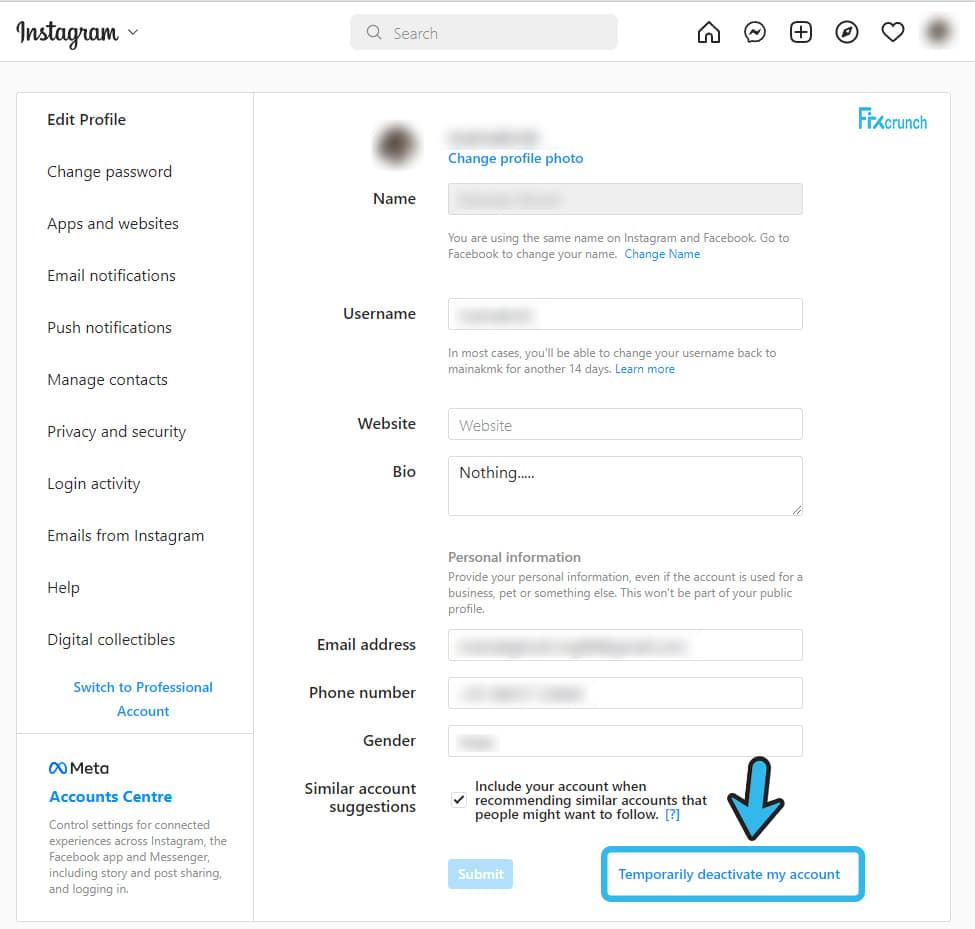
- Step 5: Enter a valid reason for disabling your IG account.
- Step 6: Wait for at least 12 hours and then log in to your Instagram account again.
- Step 7: Once your account opens, check whether you are still getting the same issue.
Many of our users have reported that they are getting a Google Play Service error once they have disabled the IG account and tried to reconnect to it. If you are also facing the same issue on your smartphone, follow our comprehensive guide to fix the “Google Play Service has stopped” error on Android devices.
11. Retrieve Instagram Through The “Forgot password” Option
If you have deactivated the Instagram account and forgot the login credentials to reactivate it again, you may need to manually change your password. And now, you can easily do it with the “Forgot Password” option on the Instagram app itself. After setting the new password, you can log in with those credentials.
- Step 1: Once you have deactivated your IG account, launch the “Instagram” app again on your smartphone.
- Step 2: Tap on the “Forgot Password” option on the login screen to initiate the procedure.
- Step 3: Once you get a new form, enter the correct “Username” and “Phone Number” which you have used while creating your account.
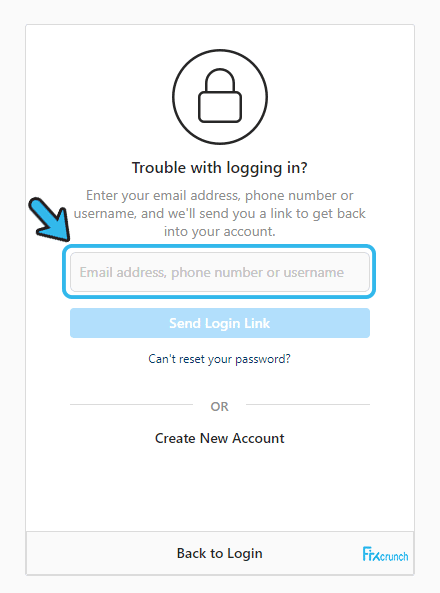
- Step 4: If the phone number and user ID match, you’ll receive a reset code via text message and email.
- Step 5: Put the exact code in the “Forgot Password” form and click on the “Reset” option.
- Step 6: Enter your new password in the designated field once prompted.
- Step 7: After your password is successfully reset, log in to your “Instagram” account with the new credentials.
You must have access to the same phone number and email ID that you have used while opening the Instagram account. If you don’t have access to those, you may not get the password recovery link or OTP to reset it. So, it is better to check your accesses first before proceeding with these steps.
12. Login With Your Facebook Account
At times, you may not solve the problem even after reactivating your IG account or resetting the login credentials. In that case, you need to manually link your IG account with your FB account. As both these products are from the house of Meta, you can enable the cross-login option.
- Step 1: Open any of your preferred mobile web browsers (Preferably Google Chrome) on your Android device.
- Step 2: Navigate to the “Instagram” website and log in with the right credentials.
- Step 3: Now, navigate to the “Profile” option to fetch the profile menu.
- Step 4: Tap on the “Account Settings” option to launch a new set of menus.
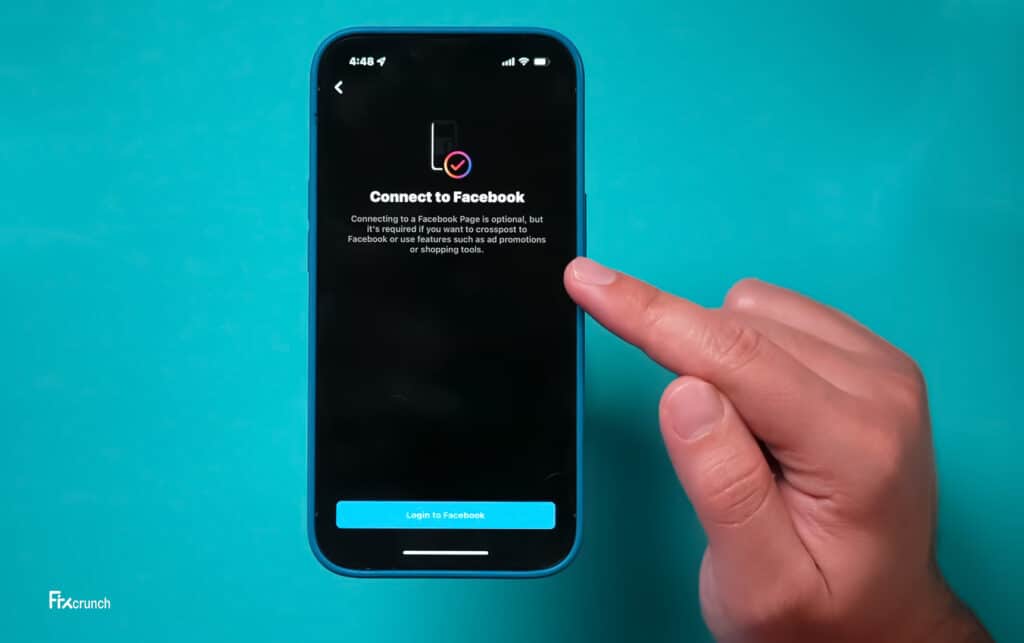
- Step 5: Link your FB account if it is not already tagged.
- Step 6: Now, exit from the app and clear the cache files on your “Instagram” app.
- Step 7: Launch the “Instagram” app on your device and use your FB login credentials to log in.
Many people still got the “there was a problem with this request Instagram connecting to Facebook” on their device once they tried to connect the IG account with the Facebook account. In such cases, you can manually link your IG account with your existing FB account through the Facebook app too.
13. Enable Two-Factor Authentication For Instagram
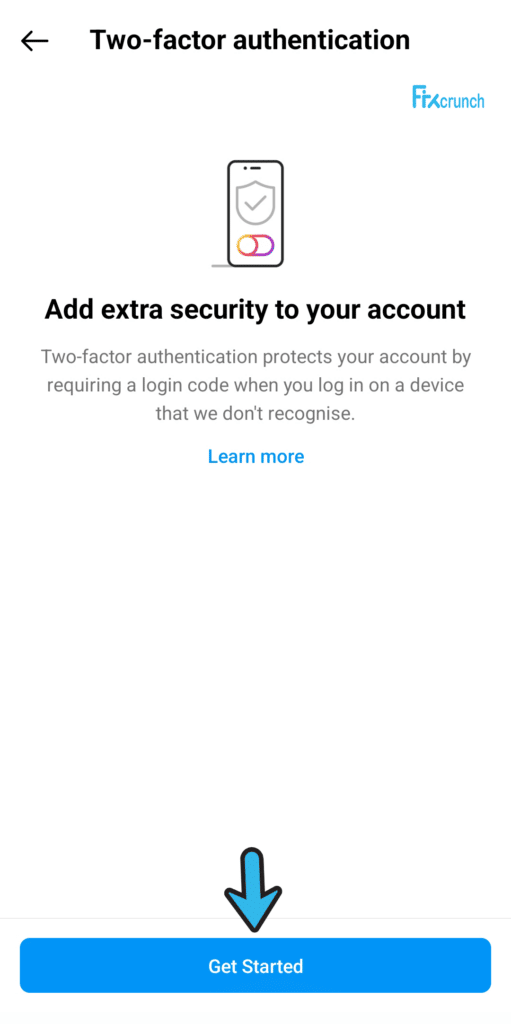
2FA or Two-Factor Authentication is a new model to protect your account, which is now available on both Facebook and Instagram. So, if you haven’t enabled it yet, you must enable it right now. And once done, you need to re-login your IG account with the new protocol.
- Step 1: Open the “Instagram” app by tapping on the icon on the app drawer of your smartphone.
- Step 2: After your account opens, tap on the hamburger icon in the top-right corner to initiate it.
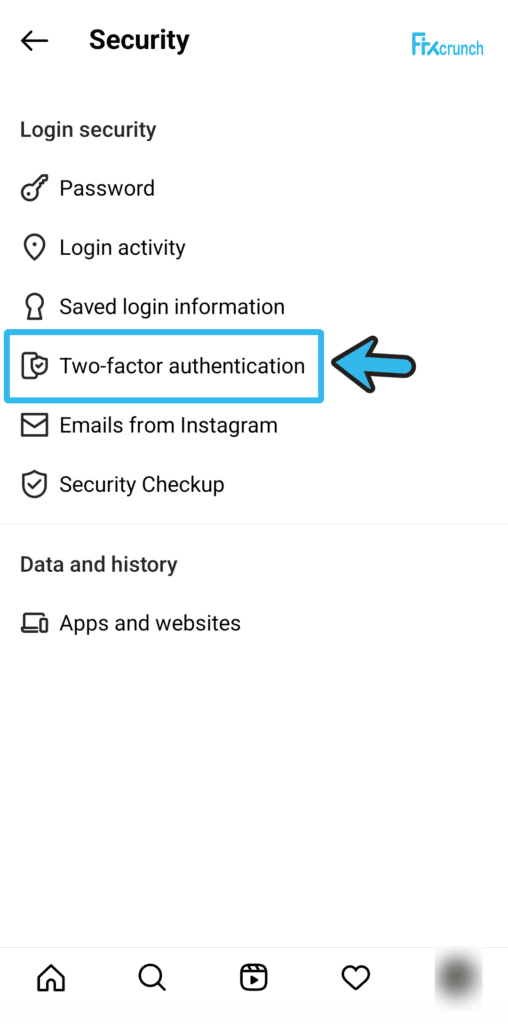
- Step 3: Once the “Settings” menu appears, scroll down and tap on the “Security” option.
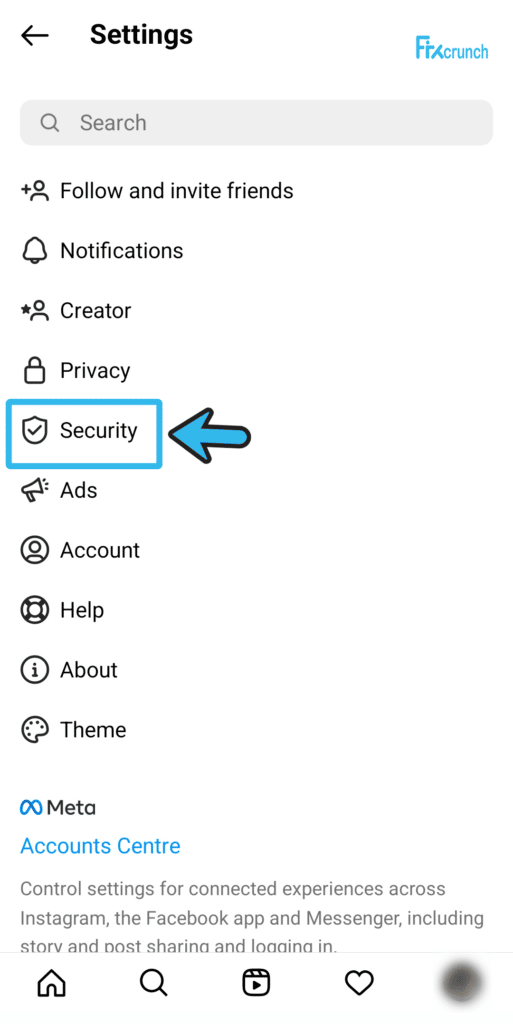
- Step 4: Now, tap on the “Two-Factor Authentication” option under the “Login Security” header.
- Step 5: Tap on the “Get Started” option to initiate the process.
- Step 6: Select your preferred security method (it is better to turn on both options).
- Step 7: Once you get a security code on your linked mobile number, enter the code to activate the 2FA authentication.
- Step 8: Now, log out from the IG app and log in again to check whether you are still getting the same issue.
If you are choosing an OTP method through your linked phone number in the two-factor authentication model, you must never disable that phone number. Otherwise, the final OTP to log in to your account won’t reach you, and you won’t retrieve your account.
14. Factory Reset Your Android Device
If none of the above-mentioned methods can fix the issue and you are still getting the “there was a problem with your request on Instagram” error message on your android device, the problem may lie in the device itself. And in that case, you must factory-reset your phone to give it a fresh start.
- Step 1: Tap on the “Settings” app (gear icon) from your app drawer to launch it.
- Step 2: Once you get a new page, scroll down and tap on the “System” option.

- Step 3: Now, scroll down the newly launched page and tap on the “Reset” button to initiate the procedure.

- Step 4: After a new set of options appears, tap on the “Erase All Data” button.
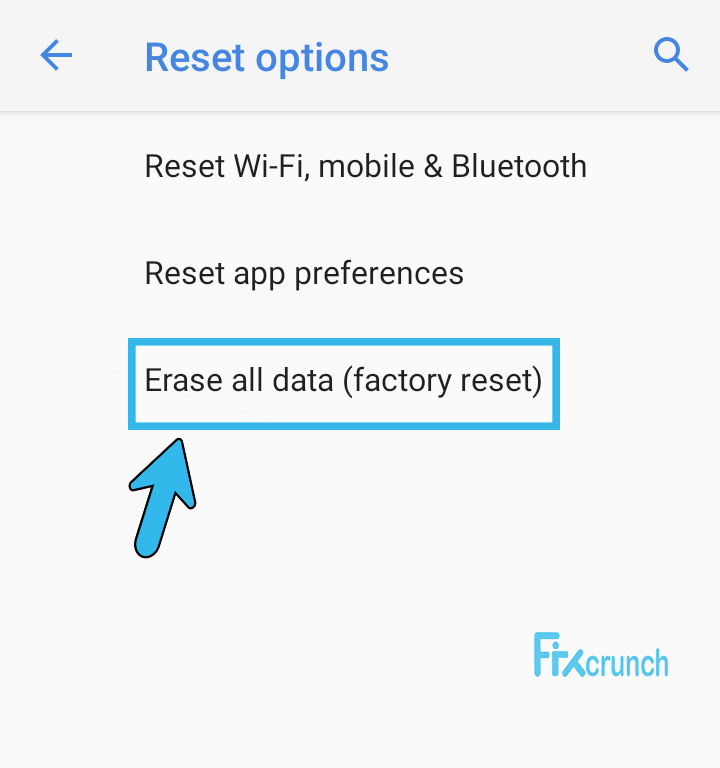
- Step 5: Scroll down to the bottom of the page and tap on the “Reset Phone” or “Erase all data (factory reset)” option.
- Step 6: Finally, tap on the “Delete All Data” option to factory reset your android device.
If you are using a Samsung phone or tablet, the options are a bit different, as Samsung uses its own UI on its devices. However, you can easily factory reset your Samsung devices in a few simple steps.
- Step 1: Open the “Home Screen” on your Samsung device and tap on the “Settings” app to launch it.
- Step 2: On the newly launched page, tap on the “General Management” option.
- Step 3: Now, scroll down to the bottom of the page and tap on the “Reset” option from the menu.
- Step 4: Tap on the “Factory Reset” button to initiate the procedure.
- Step 5: Finally, tap on the “Reset” button located at the bottom of the page.
Many of our existing users have reported to us that their YouTube has stopped completely once they have tried to factory reset their devices. If you are encountering the same issue on your smartphone as well, you can follow our detailed guide to fix the “YouTube Is Not Working” error on Android devices.
How To Contact The Contact Instagram Help Center?
If none of the generic or advanced methods are working to resolve your IG issue, the problem may be from the IG’s side. And in that case, you need to contact the help center. However, you can easily do it in a few simple steps.
- Step 1: Tap on the “Instagram” icon to launch the app and sign in with your credentials.
- Step 2: Tap on the “Three Line” icon on your profile, usually located in the top-right corner.
- Step 3: Now, tap on the “Settings” button to launch the menu.
- Step 4: From the new set of options, tap on the “Help” button.
- Step 5: Once you get a new prompt, select the “Something is not working” option.
- Step 6: Explain your problem in brief in the designated field and tap on the “Submit” button.
If you can’t access your Instagram account, you can simply open the Instagram website on any mobile browser and then click on the “Help” button located in the footer menu of the website.
FAQs
Q. Why can’t I get back into my Instagram account?
If you are banned for violating one or more community standards set by Instagram, you may not access the IG account again. However, it is better to check if you get any strike message on your linked phone number or email ID. And from there, you can appeal to Instagram to reactivate your account.
Q. Why is Instagram giving me an error when I try to log in?
This thing mainly happens when your static IP is blocked on the Instagram server, mainly due to any community guideline strike. You may also not log in to your account if you are entering the wrong credentials. Besides, this issue can even trigger if you are using an outdated IG app installed on your device.
Q. How to clone the Instagram app through the Parallel Space app?
You first need to download and install the “Parallel Space” app from Google Play Store. Once it is installed, open the app, and let it automatically load all the apps installed on your device. Now, select the “Instagram” app from the list and tap on the “Add to parallel space” option to add it.
Q. Can I get an Instagram login error on my iOS devices?
Yes, let it be an android device or an iOS one, you can still get the Instagram login error irrespective of your device type. However, you can also manually reset the app data or reinstall the app on your Apple device to fix this issue. Besides, you can also contact the help center to get more insight.
Conclusion
Before trying any of the advanced methods, you must try all the generic fixes we have mentioned above. And in 90% of the cases, those fixes can resolve the IG error in no time. However, if you have to resort to advanced fixes, always keep a backup of your data and app on a separate external drive.
So, these are all the possible solutions we have for the “there was a problem with your request on Instagram” error. But, if you think we have missed any methods, or if you know any other effective way to fix it, feel free to drop your suggestions and feedback in the comment box below.
